Monday, May 28, 2018

Garlic-Herb Crusted Boneless Pork Sirloin Roast

This recipe comes from  mygourmetconnection.

I've used this recipe and it is super simple and delicious!


Garlic-Herb Crusted Boneless Pork Sirloin Roast


This tender and juicy boneless pork roast is coated in a delicious rub made with extra virgin olive oil, garlic and fresh herbs.
  • Author: Lynne Webb
  • Prep Time: 5 minutes
  • Cook Time: 1 hour
  • Total Time: 1 hour 5 minutes
  • Yield: 6 servings

Ingredients

  • 2-1/2 to 3-pound boneless pork roast (pork sirloin)

For the rub:

  • 3 tablespoons extra virgin olive oil
  • 2 to 3 teaspoons fresh garlic, finely chopped
  • 1-1/2 teaspoons kosher salt
  • 3/4 teaspoon freshly ground black pepper
  • 1-1/2 teaspoons fresh sage, chopped
  • 1-1/2 teaspoons fresh rosemary, chopped
  • 2 teaspoons fresh thyme, chopped
  • 2 teaspoons finely grated orange zest

Instructions

  1. Bring the roast to room temperature by removing it from the refrigerator 30 minutes before cooking.
  2. Make the rub by combining the olive oil, garlic, salt, pepper, sage, rosemary, thyme and orange zest in a small bowl.
  3. Preheat the oven to 350°F.
  4. Using your hands, coat the roast completely with the prepared rub. Place on a rack in a roasting pan and pour 1/2-inch of water into the bottom of the pan.
  5. Roast the pork until a thermometer inserted into the center of the roast registers 145°F, 50 to 60 minutes.
  6. Remove from the oven, tent loosely with foil and allow the roast to rest for 15 minutes before carving.
  7. Slice and serve on a platter garnished with sprigs of fresh herbs.

Saturday, May 19, 2018

How to Smoke a Brisket

Along with ribs and pork shoulder, brisket is one of the Big Three of classic BBQ meats. “Low and slow” is the golden rule here — a low cooking temperature and a slow cooking speed. But have no fear: The art of smoking a brisket is as easy as painting by the numbers if you follow our simple steps using Kingsford® Charcoal.

rubbed brisket


Prepping the brisket


Start with a brisket in the 10- to 12-pound range, which is just the right size to fit on the grill. Trim off the excess top fat or “fat cap,” but leave a ¼"-thick layer of fat to keep the meat moist during the long cooking process. Sprinkle on a few tablespoons of rub, spreading it evenly on both sides of the brisket. Cook immediately if you’d like, or let it sit for several hours in the refrigerator to allow the rub to penetrate the meat.
  1. Prepping your cooker for smoking
  2. Be sure to use a drip pan with water directly underneath the meat to stabilize the temperature. For backyard smokers, set it up for a long smoke.  Soak a few handfuls of Kingsford Wood Chips (hickory or mesquite) or large wood chunks for about 30 minutes in warm water before placing atop the coals.

beef-brisket.gif


Smoking the brisket


Place the brisket fat side up on the top rack, cover with the lid and bring the temperature up to 225°F, using the vents to regulate the temperature.   Knowing the temp in your grill is crucial, so if your grill doesn’t have a temperature gauge, purchase a digital BBQ thermometer.

fire control with added briquets


Low and slow


Check the temperature of the grill every hour, staying as close to 225°F as possible. Resist the temptation to open the lid unless you need to add more charcoal or soaked wood chips to maintain temperature and smoke.

When the brisket’s internal temperature reaches about 150°F, the brisket’s surface evaporation causes the meat’s internal temperature to plateau. Pitmasters call this “the stall.” Don’t panic. Either wait out the stall, or wrap the brisket tightly in two sheets of heavy aluminum foil with 1/2 a cup of apple juice added (aka The Texas Crutch) and bring the grill temperature back up to 225°F.

finished brisket with smoke ring


Test for doneness.


The ideal temperature of a properly smoked brisket is 195°F, but keep in mind that the internal temp of the brisket can increase by 10 degrees even after it’s been removed from the grill. The last thing you want is to overcook your brisket, which results in dry, chewy meat. Another way of testing brisket for doneness is the “feel” method: Stick a small fork in the brisket, and if it twists easily in the meat, it’s done.

This info is provided by Kingsford charcoal.
Read more at https://www.kingsford.com/how-to/smoking/


Monday, May 7, 2018

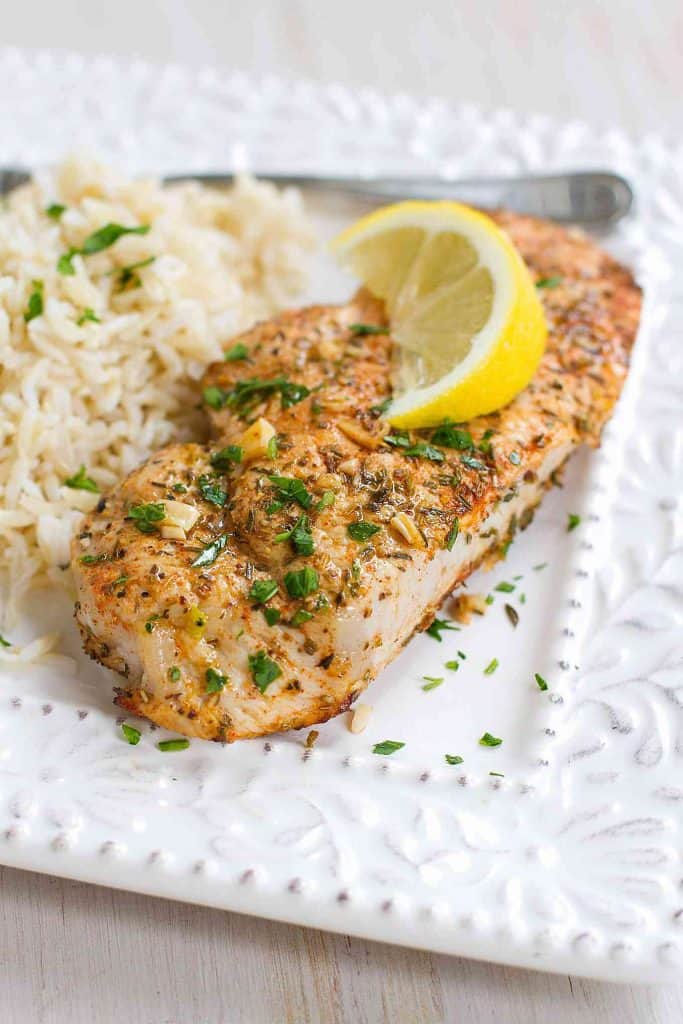
Herb Lemon Pork Chops


While this may be a 30 Minute Meal, there are only about 5 minutes of hands-on prep time. That means that while the pork chops are practically cooking themselves, you can throw together a salad and a pot of rice. Or just sit back and relax, glass of wine in hand.


Bone-In or Boneless Pork Chops, either will work well.


Coat the pork chops with a mixture of oregano, thyme, rosemary, paprika and minced cloves, and toss it all with some fresh lemon juice. Let it all rest for 15 minutes while the broiler heats, then cook for about 10 minutes.


These chops are fantastic straight out of the oven, but also work really well served cold. The second time I made these, I did so first thing in the morning, then stored the pork chops in the fridge for the day. When dinner time rolled around, I thinly sliced the chops and served them on top of a green salad with some quinoa, crumbled feta cheese and a balsamic vinaigrette.


Easy Herb Lemon Pork Chops
 
Prep time -
Cook time -
 
These Easy Herb and Lemon Pork Chops will become a regular on your family’s menu.
Tender and absolutely delicious!
Serves: Serves 4
Ingredients
  • 4 (5 oz. each) boneless pork chops
  • 4 garlic cloves, minced
  • ¾ tsp salt
  • ½ tsp ground pepper
  • ½ tsp paprika
  • ½ tsp dried oregano
  • ½ tsp dried thyme
  • ½ tsp crushed (dried) rosemary
  • Juice of ½ lemon
  • 2 tbsp minced flat-leaf parsley
Instructions
  1. Trim any fat from the pork chops. Place the pork chops and garlic in a large bowl. In a small bowl, stir together the salt, pepper, paprika, oregano, thyme and parsley. Sprinkle the salt mixture over the pork chops and garlic, and turn to coat.
  2. Squeeze the lemon juice over the pork chops. Let rest for 15 minutes.
  3. Preheat the broiler. Line a baking sheet with foil. Lightly coat with cooking spray. Place the pork chops on the baking sheet.
  4. Broil the pork chops until just cooked through, about 4 to 5 minutes per side.
  5. Sprinkle the pork chops with parsley. Serve.


Author:

Monday, April 30, 2018

Chicken Parmesan Lasagna


This recipe is lightened up, but has big Italian flavor!
I use ground chicken here, which is hearty, and full of protein.  I also cut the ricotta cheese waaaaaay down. Many recipes call for up to 2 pounds! I used 2 cups in this recipe, and still found it plenty creamy. I also cut calories by only using the Parmesan and Panko on top of the lasagna.

P.S. For the sauce in this recipe feel free to use your favorite store-bought brand, or try making it homemade!


Ingredients

For the Ground Chicken:
  • 2 teaspoons olive oil (I used extra virgin but use whatever brand/variety you like best)
  • 3 cloves Garlic, minced
  • 2 teaspoons Italian Seasoning
  • 1/4 teaspoon Crushed Red Pepper Flakes, optional (but they give a nice kick!)
  • 1 lb. Ground Chicken
  • 1/4 teaspoon Salt
  • 1/4 teaspoon Freshly Ground Black Pepper
For the Panko:
  • 1 tablespoon Olive Oil
  • 1/3 cup Whole Wheat Panko Bread Crumbs
For Lasagna:
  • 12 Lasagna Noodles, boiled according to package
  • 2 1/2 cups Ricotta Cheese (I used whole-milk here, but you may use skim)
  • 1 large egg + 1 egg yolk, at room temperature
  • 1/2 teaspoon salt
  • 1/2 teaspoon freshly ground black pepper
  • 1 tablespoon fresh parsley, chopped
  • 2 tablespoons fresh basil, chopped
  • 3 1/2 cups Marinara Sauce, Store-bought or Homemade will work OK
  • 2 cups shredded mozzarella cheese
  • 1/4 cup Parmesan Cheese, finely grated
Garnish:
  • Fresh Basil and Parsley, chopped

Instructions

For the Ground Chicken:
  1. Heat the oil in a large skillet over medium-heat. Add the garlic, Italian seasoning, and crushed red pepper flakes (if using); saute for 2-3 minutes. Add in ground chicken, salt, and pepper and cook - breaking the meat up with a wooden spoon - until golden brown and cooked all the way through; 6-8 minutes. Transfer the chicken mixture to a clean plate; set aside. Return empty pan to the burner - you will use this again for the panko.
For the Panko:
  1. Heat the olive oil (in the same skillet you used for the chicken) over medium-high heat. Add in the panko bread crumbs and cook, stirring frequently, until crispy and golden. Remove from heat and transfer breadcrumbs to a small bowl; set aside.
For the Lasagna:
  1. Boil 12 lasagna noodles according to package directions. While they're boiling, prepare the ricotta cheese.
For the Ricotta:
  1. In a large bowl, combine the ricotta, egg, egg yolk, salt, pepper, parsley, and basil; set aside.
Assembly:
  1. Preheat oven to 375 degrees (F). Spread a 1/4 of marinara sauce on the bottom of a 9x13 pan. Layer with 4 lasagna noodles, 1/3 of the chicken mixture, 1/4 cup of the marinara sauce, and 1/2 cup of the ricotta cheese, and a 1/4 cup of the mozzarella cheese. Repeat this two more times, topping the final layer of noodles with remaining meat, sauce, ricotta, mozzarella, panko bread crumbs, and finally, the Parmesan cheese, in that order. Cover the lasagna tightly with a piece of lightly oiled foil. Bake for 40 minutes, then remove the foil and bake uncovered for 15 more minutes. Allow the lasagna to rest for 10 minutes before cutting and serving. Garnish with fresh parsley and basil.


Creamy Herb Chicken

Quick And Easy Creamy Herb Chicken, filled with so much flavor, ready and on your table in 15 minutes! You won't believe how easy this is!  Perfect served over rice or noodles.


Ingredients
For The Chicken:
  • 4 chicken breasts (pounded 1/2-inch thin)
  • 2 teaspoons each of onion powder and garlic powder
  • 1 teaspoon fresh chopped parsley
  • 1/2 teaspoon each of dried thyme and dried rosemary*
  • salt and pepper , to season
For The Sauce:
  • 4 cloves garlic , minced (or 1 tablespoon minced garlic)
  • 1 teaspoon fresh chopped parsley
  • 1/2 teaspoon each of dried thyme and dried rosemary
  • 1 cup milk (or half and half)*
  • Salt and freshly ground black pepper , to taste
  • 1 teaspoon cornstarch mixed with 1 tablespoon water , until smooth
Instructions
  1. Coat chicken breasts with the onion and garlic powders and herbs. Season generously with salt and pepper.
  2. Heat 1 tablespoon of oil a large pan or skillet over medium-high heat and cook chicken breasts until opaque and no longer pink inside (about 5 minutes each side, depending on thickness). Transfer to a plate; set aside.
  3. To the same pan or skillet, heat another 2 teaspoons of olive oil and sauté garlic, with parsley, thyme and rosemary, for about 1 minute, or until fragrant.
  4. Stir in milk (or cream); season with salt and pepper, to taste.
  5. Bring to a boil; add the cornstarch mixture to the center of the pan, quickly stirring, until sauce has thickened slightly. Reduce heat and simmer gently for a further minute to allow the sauce to thicken more.
  6. Return chicken to the skillet. Sprinkle with extra herbs if desired. Serve immediately.
Recipe Notes
*If you don't like Thyme or Rosemary, substitute these with Basil and Oregano, or use Tarragon.
**For a dairy free option, I find Cashew milk the best in flavor. You can also use almond milk or rice milk.
Yes, heavy cream can be substituted!

This Recipe comes from CafeDelites

Monday, February 26, 2018

Queso Chicken Bake

Boneless, skinless, chicken breast fillets are on sale this week, in a value pack for just $1.59 lb. - Feb 28 - March 6, 2018, at 6 Harter House locations.  Check out our weekly ad flyer to see everything on sale this week.


This Queso Chicken Bake takes a few simple ingredients and blankets them with the rich and creamy cheesiness of queso for a quick and easy one pan meal that your whole family will love.

The whole thing takes only a few minutes to mix together, so it makes a perfect weeknight meal.

You can serve it over some rice and top it off with fresh diced tomatoes, chopped cilantro, and cool sour cream if you’re feeling fancy, but that moist chicken and creamy cheese is all you really need. 

Queso Chicken Bake
1 hour, 15 minutes to prepare serves 6-8

4 boneless skinless chicken breast fillets from Harter House
1 jar (23 oz) salsa con queso
1 can (15 oz. ) black beans, drained
1 can (15 oz.) fire-roasted diced tomatoes and green chilies
1 bell pepper, seeded and chopped
1 cup shredded Mexican cheese blend
1 package (1 oz) taco seasoning mix
Sour cream, to garnish (optional)
Tomatoes, diced, to garnish (optional)
Cilantro, chopped, to garnish (optional)

Preparation

  1. Preheat oven to 375°F and lightly grease a 9x13-inch baking dish.
  2. Season both sides of chicken with taco seasoning and place in baking dish.
  3. In a medium bowl, combine beans, bell pepper, tomatoes and green chilies, and salsa con queso and stir until incorporated. Pour over chicken, spreading out with a rubber spatula if needed.
  4. Top with shredded cheese and cover dish with foil. Place in oven and bake 30 minutes.
  5. Remove foil and continue baking until sauce bubbles and chicken is cooked through, 10-15 more minutes.
  6. Remove from oven and garnish with sour cream, tomatoes, and cilantro, if desired. Enjoy!
Recipe adapted from The Pinning Mama.

Monday, February 5, 2018

Whole Wheat Honey Banana Muffins


"These Whole Wheat Honey Banana Muffins are so good people won’t even notice they’re healthier, my kids had no idea! Instead of being made with plain white flour they are made with healthier white whole wheat flour, then instead of being made with granulated sugar they are made with honey and about half the amount in comparison to the typical amount of sugar that’s normally added. Then another healthier swap is the coconut oil in place of the butter. I’m not normally someone that’s into healthier baked goods but when they’re this good then I’m all in!"


Ingredients
2 cups white whole wheat flour, plus more for dusting*
1 tsp ground cinnamon
1 tsp baking soda
1/2 tsp fine sea salt
1/2 cup coconut oil
1/2 cup  honey
3 large eggs
1 1/2 cups well mashed overripe bananas
1/4 cup buttermilk or plain Greek yogurt

Directions
Preheat oven to 325 degrees. Spray the holes of 16 muffin cups with non-stick cooking spray and dust lightly with wheat flour. Shake out excess flour, set aside. In a medium mixing bowl whisk together white whole wheat flour, cinnamon, baking soda and salt for 20 seconds. Set aside.

Add coconut oil to a large microwave save mixing bowl. Heat in microwave until it's just melted. Stir in honey then whisk in eggs. Whisk in bananas and buttermilk. Add wheat flour mixture and whisk just until combined (batter will be lumpy). Divide batter among prepared muffin cups filling each about 3/4 full. Bake in preheated oven until toothpick inserted into center of a muffin comes out clean or with a few crumbs, about 16 - 20 minutes. Run a butter knife around muffins to loosen. Then transfer to a wire rack to cool. Store muffins in an airtight container.

*Whisk flour in container before measuring, then scoop using a measuring cup and level top using a butter knife.

Yield: 16 muffins
Recipe source: Cooking Classy