Tuesday, June 16, 2020

Copy Cat Sonic Fried Onion Rings


I ate recently at Sonic and I had forgotten how much I LOVE their onion rings.
So I asked Google and sure enough, I came up with this copy cat recipe.

A former Sonic employee states, "The secret ingredient is vanilla ice milk mix, but using melted vanilla ice cream works just as well."

Making these onion rings can be messy, so it is suggested trying to use one hand for dry ingredients and the other for dipping the onion rings into the melted ice cream. It will go easier this way.


Ingredients


2 pounds Vidalia onions - sliced, and rings separated
24 ounces water
2 cups all purpose flour
12 ounces vanilla ice cream melted
8 ounces corn meal
vegetable oil for frying

Instructions

  • Peel onions. Slice onions into slices that are between 3/8 and 1/2-inch. Remove the small center of the onions, you can chop those into diced onions. Separate onions into rings, and place the rings into a large bowl of water.
  • Place three containers in a row. In the first container, place the flour, in the second container, place the melted ice cream, and in the third container place the cornmeal.
  • Preheat oil to 350 degrees.
  • Prepare onion rings by shaking off the water, dip onion into the flour, shake off excess flour. Dip into the melted ice cream, and then dip into the cornmeal. Gently shake off excess cornmeal. Place the onion ring on a cookie sheet to dry for a few minutes before frying.
  • Fry onion rings until golden brown.

Recipe Tips for the Cook

Sifting the flour and corn meal once in a while keeps lumps out and makes it easier to coat the rings 
When placing on cookie sheets to save room, lean on top of each other to allow entire ring to dry.


How to Make Crispy Onion Rings

Deep-fried onion rings should be crisp on the outside but tender within. 
  1. Heat the oil over medium-high heat. Allow it to heat up hot enough to fry, but not to smoke. The best temperature is 350 - 375 degrees. Use a deep-fry or candy thermometer attached to the side of your pot/frying vessel. This helps you adjust the temperature if it does not remain consistent. If the temperature becomes too low, the rings will soak up too much oil, and you will end up with soggy rings.
  2. Cook the onion rings in small batches, so they don’t stick together. When one side is fried, turn them over to brown on the other side. The process should take about three minutes.
  3. Don’t place your cooked onion rings directly on top of paper towels to drain. If you do so, the onion rings will soak up whatever oil ends up on the paper towel. Instead, place some paper towels on a cookie sheet and then lay a wire cooling rack on top. Place your fried rings on top of the rack to drain, so they don’t sit in oil.
  4. Season with some salt and serve your perfect crispy onion rings immediately.

Tuesday, June 9, 2020

Honey Garlic Salmon


Salmon

The browned butter mixed through that honey garlic sauce is what makes that salmon recipe stand out from the rest. 

Pan Seared Salmon

This salmon gets cooked right in the sauce. There’s no searing or frying first. Why? Because a lot of people get anxiety at the thought of frying then flipping salmon and having the fillets fall apart on them halfway through cooking. 

Q. But how do I get the same crispy edges from searing? A. Once the salmon is half way done, you’re going to broil your fillets for a couple more minutes for that extra golden, crispy and caramelized finish.


For a stronger lemon flavored salmon, add the wedges into the pan when your sauce is bubbling 
(the peel provides all of the flavor this way). For a milder flavor, leave them out. 
Make this Easy Honey Garlic Salmon for your dinner table tonight!


Ingredients

  • 4 fresh salmon fillets about 1/2 pound each, skin off or on
  • Salt and pepper, to season
  • 1/2 teaspoon paprika (mild, sweet or smokey)
  • 2 tablespoons butter
  • 4 cloves garlic, finely chopped or minced
  • 4 tablespoons honey
  • 1 tablespoon water
  • 2 teaspoons soy sauce
  • 1 tablespoon fresh squeezed lemon juice, (plus extra to serve)
  • Lemon wedges to serve

Instructions

  • Arrange oven shelf to the middle of your oven. Preheat oven to broil/grill settings on medium heat. 
  • Season salmon with salt, pepper and paprika. Set aside.
  • Heat the butter in a skillet or pan over medium-high heat until melted. Add the garlic and sauté for about a minute, until fragrant. Pour in the honey, water and soy sauce; allow the flavors to heat through and combine. Add in the lemon juice; stir well to combine all of the flavors together.
  • Add the salmon steaks to the sauce in the pan; cook each fillet (skin-side down if there's any skin) for 3-4 minutes or until golden, while basting the tops with the pan juices. Season with salt and pepper, to taste (if desired).
  • Optional -- Add the lemon wedges around the salmon (adds a stronger lemon taste). 
    Baste salmon one more time then transfer the pan to your oven to broil / grill for a further 5-6 minutes, or until the tops of the salmon are nicely charred, and the salmon is cooked to your liking.
  • To serve, drizzle with the sauce and a squeeze of lemon juice. Serve with steamed vegetables; over rice or with a salad.

FROM;
Cafedelights.com

Tuesday, May 26, 2020

Bacon and Egg Spaghetti

Sean and Jen are a couple from the US currently traveling the world full-time.
Their food blog has cultural classics from all over the globe.  I have saved their website in my favorites and hope to experience some new flavors.


This Bacon and Egg Pasta Recipe would be a great weekday dinner or a perfect addition to a Sunday Brunch menu.

This recipe uses familiar ingredients.  It's simple, and delicious.


Ingredients

1 lb dry spaghetti
6 strips of thick sliced bacon, 8 strips if using a thinner
2 tablespoons extra virgin olive oil
4 cloves garlic, minced
1 cup grated Parmesan or Pecorino cheese
4 eggs
1/4 teaspoon of crushed red pepper
handful of roughly chopped Italian parsley
salt and fresh ground pepper to taste.

Instructions

  1. Add 4 - 5 quarts of salted water to a rapid boil. Add spaghetti and cook until al dente.
  2. In the mean time, brown bacon in a pan until crispy. Remove bacon and blot on a paper towel. Crumble when cool.
  3. Remove all but 1 tablespoon of bacon fat from the pan.
  4. Add 2 tablespoons of olive oil and garlic to the pan and cook until the garlic just begins to brown (do not burn).
  5. Crack eggs into the pan and cook until the egg whites are almost set (the yolks should still be runny in order to create the sauce. 
  6. Add the drained pasta, bacon and crushed red pepper to the pan and stir, breaking up the egg whites. 
  7.  Add additional olive oil (or you can use a little of the pasta water) if the pasta is not completely coated with sauce.
  8. Toss with the cheese and the parsley along with a sprinkle of salt and fresh ground pepper. 


FROM
Venturists
Adventures in Food and Travel


Monday, May 11, 2020

Cookies and Cream Ice Cream Cake


Ingredients

  • 1 9x4" Loaf Chocolate Pound Cake
  • 5 cups (or thereabouts) vanilla ice cream (I used little less than 1 1/2 quart)
  • 18 Oreo Cookies
  • Optional: 1 cup whipped cream

Instructions

  1. Line a loaf pan that is the same size as the pound cake being used with wax paper.
  2. Slice the pound cake length-wise into 3 equal layers.
  3. Place a layer of the cake in the bottom of the wax paper lined loaf pan.
  4. Spread about one third of the ice cream, slightly softened, over the cake.
  5. Sprinkle a layer of crushed Oreos/chocolate cream-filled cookies over the ice cream; gently press into the ice cream.
  6. Repeat sequence twice more until you've built 3 layers of each
  7. Gently press a layer of wax paper over ice cream cake to seal.
  8. Cover with plastic wrap and place in freezer until firm.
  9. Optional: When ready to serve, top with layer of whipped cream, and more crushed Oreos/chocolate cream-filled cookies.


Cut into slices and enjoy!


– Work quickly when putting the cake together. Ice cream has a tendency to melt.  So be prepared with all pieces and parts ready to assemble.

– Easily substitute fruit or other cookies for the Oreos or delete the cookies altogether. Another flavor of ice cream or cake could be used as well to create your own ice cream cake creation.


Monday, February 17, 2020

Beef and Bean Burritos with Chile Peppers

Do you have a favorite recipe that your whole family loves and asks for regularly?  For our family, this is one of those recipes.  I know your family will enjoy it as much as mine!   ~Shelly

Yields: 4 Servings
Prep Time: 30 Minutes

Ingredients:
2 tablespoons vegetable oil
1/2 medium white onion, chopped
1 small leek (tough green part of stalk removed and discarded), cleaned and thinly-sliced
4 cloves garlic, chopped
1 1/2 pounds Harter House Ground Chuck 
Salt and freshly-ground pepper to taste
Cumin, Oregano, and Chili Powder, to taste
1 roasted Chili Pepper, chopped
1 can (7 ounces) of Enchilada Sauce (reserve remaining 1/2 can to drizzle over rolled burritos before baking)
Refried Bean Mixture (see recipe below)
Flour tortillas

Cilantro leaves for garnish

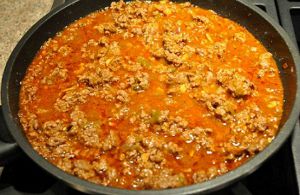
beef sauce cooking

Preparation:
In a large sauté pan or frying pan over medium-high heat, heat the vegetable oil. Add the onion and leek; cook until fragrant. Add garlic and cook 1 minute more. Add ground sirloin and sauté until brown. Add salt, pepper, cumin, oregano, and chili powder to taste. Add the Chile pepper and 1/2 can Enchilada Sauce; stir mixture well. Turn heat to medium low and gently simmer until the meat has absorbed all the sauce.
Prepare Refried Bean Mixture.
When ready to serve, heat the flour tortillas in the microwave for 1 minute. Spread each warm tortilla with some prepared Refried Bean Mixture and then some prepared Beef Mixture. Roll the prepared tortillas up enchilada style and place on microwave-safe serving dish. 
Drizzle remaining 1/2 can Enchilada Sauce over the top and sprinkle with the grated cheddar cheese. Microwave until cheese is melted and the burritos are hot. Garnish with fresh cilantro leaves, and more Enchilada Sauce, if desired.
Optional garnishes: sour cream, salsa, Guacamole, and/or pico de gallo

Serve immediately.
Makes 4 servings.

  
Refried Bean Mixture: 
1 tablespoon vegetable oil
1/2 medium red onion, chopped
4 cloves garlic, chopped
1 can (16 ounces) refried beans
1 roasted Chili Pepper, chopped
2 strips bacon, browned to crispy and broken into pieces
1 tablespoon of your favorite hot sauce or taco sauce
In a saucepan, heat 1 tablespoon vegetable oil, add red onion and sauté until fragrant. Add garlic and sauté 1 minute more. Add refried beans, Chile Pepper, bacon, and hot sauce. Mix well and gently heat on low for approximately 20 minutes.

Photo by Karen Calanchini, Food Stylist and Photographer, of Redding, CA.

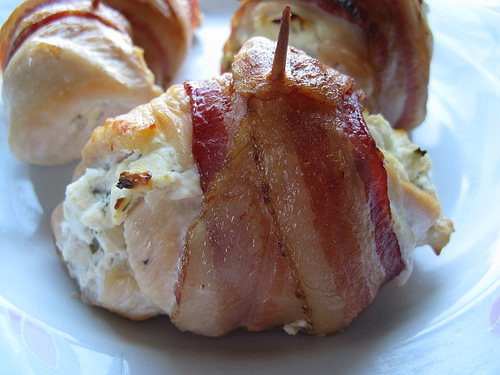
Bacon Wrapped Chicken

Chicken, and bacon, better yet, crispy bacon. They are two of my favorite foods both in one easy recipe.

I was looking for an easy dinner which brings us today’s recipe for Bacon Wrapped Chicken.


What really surprised me was the amount of ingredients in this recipe, there are very few! I feel the chive and onion cream cheese is a huge ingredient in the flavor department and does most of the work for you.


Try and pound the chicken breasts down with a mallet as thinly as possible because they will roll up a lot easier. If you want to do some outdoor grilling these can also be grilled as well. They go great with a side dish of pasta or flavored rice. Enjoy


Bacon Wrapped Chicken
Ingredients:
12 boneless skinless chicken breasts halves
2 (8 oz) cartons chive and onion cream cheese
12 slices of bacon
salt (to taste)
2 tablespoons butter

I recommend the Fresh, Never Frozen Boneless Chicken Breasts, in the fresh meat counter at Harter House Supermarket.


Cooking Instructions:

Step 1: Preheat the oven to 400 degrees. Between 2 sheets of wax paper, with a mallet, flatten chicken breasts to ½” thickness.

Step 2: Spread 3 tablespoons of cream cheese over each chicken breast. Then Dot with butter and season with salt. Wrap with bacon and stick a toothpick through the rolled chicken breast to hold it together. Roll up and stick a toothpick through to hold it together.

Step 3: Bake uncovered for 35-40 minutes (or until juices run clear).

Step 4: Turn on the broiler and broil six inches from the heat for 5 minutes or until the bacon is crispy.


Tuesday, January 28, 2020

WICKED GOOD, NO-FRY WINGS

Wings go great with friends, football and ice cold beer. You can't go wrong with any of these recipes.  ~~Shelly


UNCLE DOUGIE’S, WICKED GOOD, NO-FRY WINGS  
WHAT YOU NEED:
1 Bottle Wicked Good Wing Marinade
4 lbs Fresh Chicken wing drumettes
1 large baking dish*
Uncle Dougies Wicked Good Wing Sauce
Available at both Springfield
Harter House locations.

OPTIONAL:
Large kitchen storage bags
Disposable aluminum oven roasting pan
PREPARATION:
  1. Wash and dry wings
  2. Place wings in marinade so they are smothered ( Plastic Kitchen Bags work great!)
  3. Place in Fridge for a half hour
  4. Go to the oven or grill with these babies!
CONVENTIONAL OVEN:
Preheat: 
Conventional oven to 400˚ | Convection to 375˚
Pour wings and marinade into a lasagna-style baking dish(es).
* You can use a disposable aluminum foil, oven roasting pan 
and cut your clean-up time and trouble completely out of the equation!

Bake: 
1 hour, rolling the wings at least twice during the cooking cycle.
After all the marinade has baked into the wings and there is no moisture left in the pan, cook to desired crispness.
* but anytime after 60 minutes will be delicious
GRILL:
Just cook it like chicken! For extra heat, Brush with marinade often during cooking.
* For an extra-tasty touch, glaze with Sweet N Snappy BBQ sauce during the last couple of minutes of grilling.

*********************************************


Frank's RedHot Original Buffalo Chicken Wings

Discover just how simple it is to make this Buffalo wings recipe right at home.

Ingredients

Directions

Preheat oven to 450°F. Mix butter and RedHot Sauce in medium bowl; set aside.

Arrange wings on large foil-lined pan. Bake on lowest oven rack for 30 minutes or until crispy, turning once.

Toss wings in sauce mixture until well coated. Serve with blue cheese and celery, if desired. 

OR
Substitute 3/4 cup FRANK'S® RedHot® Buffalo Wings Sauce for the RedHot Original Sauce and butter.


***********************************************


Moore's Classic Buffalo Wings

Ingredients

1 cup Moore’s Original Marinade
1 cup Moore’s Original Buffalo Wing Sauce
1 pound fresh or frozen chicken wings; if frozen, thaw
 

Instructions

1. Pour Moore’s Original Marinade over meat.
    Refrigerate for at least 30 minutes.
2. Grill or bake wings until cooked throughout.
     Internal temperature should be 165 degrees.
3. In a large bowl, pour Moore’s Original Buffalo Wing sauce over       wings and toss until thoroughly mixed.