Sunday, August 16, 2015

Walnut-Crusted Pork Chops with Autumn Vegetable Wild Rice

This week at Harter House Supermarkets in Springfield, we have featured in our Ad, Boneless Sirloin Pork Chops for $1.99 lb. (Aug 19-25, 2015). So here I have found a wonderful recipe to share with you featuring our famous Sirloin Pork Chops.

Ingredients
• Sirloin Pork Chops from Harter House
• 1 1/2 teaspoons Worcestershire sauce
• 3/4 teaspoon kosher salt
• 1/2 teaspoon dried sage
• 1/4 teaspoon freshly ground black pepper
• 1/3 cup walnuts, finely ground
• 1 bacon slice
• 1/4 cup fat-free, less-sodium chicken broth

• Rice
• Cooking spray
• 1 cup finely chopped onion
• 1/2 cup diced carrot
• 2 teaspoons diced seeded jalapeño pepper
• 1 garlic clove, minced
• 1 1/2 cups finely trimmed chopped Swiss chard (or spinach)
• 1 cup sliced mushrooms
• 1 cup chopped peeled Granny Smith apple
• 2 cups cooked wild rice
• 1/2 cup fat-free, less-sodium chicken broth
• 1/4 cup chopped fresh flat-leaf parsley


Preparation
1. To prepare pork, place chops in a shallow dish; drizzle evenly with Worcestershire. Combine salt, sage, and black pepper in a small bowl. Reserve 3/4 teaspoon salt mixture. Add walnuts to remaining salt mixture; toss well. Press walnut mixture onto both sides of pork chops. Cover and refrigerate 30 minutes.

2. Cook bacon slice in a large nonstick skillet over medium heat until crisp. Remove bacon from pan; crumble. Add pork chops to drippings in pan; cook 1 1/2 minutes on each side or until lightly browned. Add 1/4 cup chicken broth to pan. Cover, reduce heat, and cook 6 minutes or until desired degree of doneness. Remove pork from pan.

3. To prepare rice, heat a large saucepan over medium heat. Coat pan with cooking spray. Add onion and next 3 ingredients (through garlic) to pan; cover and cook 5 minutes or until onion is tender. Stir in reserved 3/4 teaspoon salt mixture, chard, mushrooms, and apple. Cover and cook 5 minutes or until carrot is tender. Stir in rice and 1/2 cup broth. Bring to a simmer; cook, uncovered, 5 minutes or until liquid is absorbed. Stir in bacon. Place 1 cup rice mixture on each of 4 plates; top each serving with 1 pork chop. Drizzle each serving with pan drippings, and sprinkle each with 1 tablespoon parsley.


Enjoy!

Saturday, July 25, 2015

Thai Shrimp and Carrot Salad

I am always looking for new recipes for myself and for my Harter House friends. Today I found this fresh Asian Salad compliments of Whole Foods.

A light and refreshing salad served over a bed of rice noodles, this dish can easily transform into a vegetarian side by leaving out the shrimp. It's best eaten the day you make it.


Serves 6
Ingredients

8 ounces uncooked rice noodles
1/4 Cup lime juice
1/4 cup rice vinegar
1/8 teaspoon crushed red chile pepper
1/2 pound cooked, peeled and deveined medium shrimp with tails removed
3 cups shredded carrots
1/2 cup dry-roasted unsalted peanuts
1/2 cup sliced shallots
1/3 cup chopped fresh mint


Method

Cook noodles according to package directions. Rinse until cool, then drain and place in a large bowl. In a separate large bowl, combine lime juice, vinegar and crushed red pepper to make a dressing. Toss noodles with 2 tablespoons of dressing. Toss remaining dressing with shrimp, carrots, peanuts, shallots and mint. Serve shrimp mixture over rice noodles.

Nutrition

Per serving: 290 calories (70 from fat), 8g total fat, 1g saturated fat, 75mg cholesterol, 160mg sodium, 61g total carbohydrate (8g dietary fiber, 7g sugar), 24g protein

Monday, July 6, 2015

Hot Wings with Habanero–Honey Sauce


While scouring the internet, I found this recipe.  I love chicken wings and I love hot and spicy, so this recipe called out to me.  It looks pretty easy, so I want to give it a try!  ~Shelly
Potent habanero peppers add an undercurrent of heat to the sweet and buttery sauce that accompanies these wings. It's recommend wearing plastic gloves when handling habaneros. 
Visit Harter House and Harter House World Flavors.


Habanero-Honey Sauce
  • 1/2 cup lime juice
  • 1/4 cup white wine vinegar
  • 5 medium (about 1 1/2 ounces) habanero peppers, stems removed
  • 1 teaspoon salt
  • 2 sticks butter
  • 1/2 cup honey
Tempura Batter:

1 cup all-purpose flour
1 cup cornstarch
1 tablespoon baking powder
1 tablespoon salt
2 cups water
1 cup ice


Seasoned Flour:

3 cups all-purpose flour
2 tablespoons salt
2 tablespoons paprika

Wings:
Peanut or canola oil for frying
2 pounds whole chicken wings, drumettes and wings separated and tips removed


Yield: 4 servings
Method:
To make the habanero–honey sauce, combine the lime juice, vinegar, habanero peppers, and salt in a blender and purée until smooth. Strain through a sieve and discard the solids. Set aside. Heat a large saucepan over medium heat and add the butter. Cook until the butter turns golden brown and develops a nutty aroma, about 8 minutes. Remove from the heat and scrape into a medium bowl. Whisk in the honey and a tablespoon of the habanero vinegar. Taste and add a little more vinegar if desired. Set aside until needed. Discard the vinegar or save for another use.
To make the tempura batter, whisk together the flour, cornstarch, baking powder, and salt in a large bowl. Add the water and ice; mix well to smooth out any lumps. Set aside.
To make the seasoned flour, whisk together all of the ingredients in a large bowl. Set aside.
Add about 6 inches of frying oil to a deep pot. Heat the oil until it reaches 350°F.
While the oil is heating up, prepare the wings for frying: dip one wing in tempura batter. Shake off any excess batter, then coat in seasoned flour. Place the wing on a baking sheet. Repeat with the remaining wings.
Working in batches, fry the wings until golden brown, about 4 to 5 minutes. (Make sure the temperature of the oil returns to 350°F before frying a new batch, or the wings will be greasy.) Transfer the fried wings to a paper towel–lined plate or baking sheet.
If needed, whisk the habanero–honey sauce again to make sure everything is well combined. Toss the wings in about a cup of the sauce, or serve the sauce on the side for dipping.


Sunday, July 5, 2015

How to Peel Garlic & Garlic Salsa Verde Recipe


If you don't know how to peel garlic you might end up doing it the long, hard way. You can use packaged peeled garlic, but personally, I prefer to buy my garlic fresh at Harter House Supermarket and peel them myself.

I think it's more economical and sustainable this way - the garlic comes direct from the market without any plastic packaging, and has less carbon footprint because the garlic wasn't processed by machines and then shipped to supermarkets.
Here is quick and easy technique for peeling garlic.
First, pick off your cloves from the bulb, and lay the flat side down - the side that was closest to the "heart" of the garlic - on your cutting board with the curved side up. Then, take your chef's knife and with one hand holding the knife handle, lay either flat side of the knife on top of the garlic clove. The garlic should be closer to the knife handle than the center of the blade.

With your free hand, slap the heel of your hand down and smash the side of the blade against the garlic clove. Voilà! The outer skin is magically detached from the clove, and you now have a perfectly peeled clove ready for chopping.

On their first try, most people don't hit the blade hard enough and end up hitting it two or three times. With enough practice, you'll get the hang of figuring out how much force you need so you only have to smash the knife blade once. In no time, you'll be a seasoned pro, pounding away at garlic and quickly getting enough peeled cloves to make Chicken with Forty Cloves of Garlic without breaking in a sweat. Oh, and don't forget to sweep the skins in your compost bin!


How To Mince Garlic
Some folks will tell you that the best way to mince garlic is with a garlic press!

A garlic press is certainly handy, but if you don't have one or just feeling like doing it the old-fashioned way, here's one method that works well!

After peeling your garlic clove, lay it on the cutting board on one of its flat sides so it's stable and doesn't roll. Trim off the tough roots from where the garlic clove was attached to the head.
Cut the garlic in thin strips along its length -- from root to tip.
Carefully turn the garlic 90-degrees and cut strips in the other direction. You'll be left with a little pile of thin sticks.


Sprinkle the pile with a pinch of salt. This is a little chef's trick that helps keep the garlic from sticking to your knife!

Run your knife back and forth over the pile of garlic until it's as finely minced as you like it. It's easiest to do this if you hold your knife in front of you parallel to your body. Set the tip of the knife on the cutting board just to the left of the pile of garlic (to the right if you're a leftie!).
Leaving the tip of the knife against the cutting board, use the heel of the knife to chop the garlic. Use a rocking motion and move the heel of the knife a bit when you lift up so you cut into the pile at a different place each time.
If you think cutting the garlic into sticks fussy, you can certainly start with a whole clove and just keep chopping until it's as finely minced as you like it!

********************************************

Now to use our new skill, lets make some Garlic Salsa Verde.
This is another personal favorite salsa. It's simple, easy, and punchy - cilantro, garlic, and lime. It's hot and spicy and sour all at once.

We like it straight up with chips, but it's also excellent with grilled chicken or black beans and rice. I think that proper salsa verde includes tomatillos, but this is another version that we like a lot.

Garlic Salsa Verde
makes about 1 cup

2 large bunches of cilantro
6 garlic cloves
1 jalapeno
Juice of 2 limes
Olive oil
Salt

Take the cilantro off the stems and chop fine. Mince the garlic and jalapeno. Whiz everything in the food processor or blender, adding a drizzle of olive oil if it is too thick. Season with salt.

Sunday, June 14, 2015

Employees Father's Day Memories

     It was in the year 1972, that US President Nixon proclaimed Father’s Day to be a national holiday. Now this day is celebrated on the 3rd Sunday of the month of June every year.     

     Some think of it as another “Retail Holiday”, another day we must buy a gift for our dad.  Father’s Day is not about how much money you spend, but it really comes down to the time you spend with him.  Your Dad will still love you the same whether he gets a gift or not, but he will appreciate you more for just thinking about him and being with him if possible on this day.

     Our Father’s Day celebration includes all people who have fatherly attitudes. So it includes our dad, uncles, grandpas etc… They all have done a lot to shape our potential and make us great individuals.  On this day we say THANKS to all of them for all the things that they have been doing throughout the years. They all have been very influential factors in determining the shape of our life.


I am reminded of my favorite things about my Dad as the holiday approaches.  We were always on the water.  We always had a boat and we spent every vacation and holiday at the lake.  I remember my dad saying once that just being with his family was most important and memorable because he was able to spend time in the place he loved the most with the people he loved the best.


So, instead of buying him a coffee mug or tie, simply take a walk through your neighborhood together with your dad or enjoy a meal together (purchased from Harter House of course).  

Here are some memories from our staff of their fathers.


“As a young child, my dad would always tell me to pull his finger!!”  Kim


“My dad liked to check out all my boyfriends, because my dad was a cop.  Also, he would jump out from behind anything and scare the cr** out of us.”  Roxann


“My dad used to take me out to breakfast almost every day before school and I was always late for school.  They knew me well in the office.”  And my grandpa would keep cookies in the back of his desk drawer and we would “sniff them out.”    Mallory


“My dad would ask if you wanted to split a donut.  Then he would cut it horizontal and keep the top with the icing and give away the bottom half.”  Michele


“My dad would say, I smell something spoiled, (sniff, sniff) spoiled rotten.”  Sharon


“I spent time with my Grandpa on Father’s Day fixing his Massey Ferguson Tractor.  His words of wisdom for me were to watch out for girls, they are trouble.  And stay single till I’m at least 30.”    Austin


 "When I was 15 it was the first time that my dad took me driving and I drove into the neighbors yard and he said that would be the last time he would drive with me, and it was!"  Heather


"When I was 5 or 6 my dad and I were out riding horses and we found a 6 pack of (warm) beer on the road.  He opened it up and let me try it.  I hated it and I have never had beer since."  Brooke


For all you DADS out there...

Make it a great Father's Day Weekend!

Tuesday, June 9, 2015

Braised Salmon with Leeks


This week, June 10 - 16, 2013,
at Harter House Supermarkets
in Springfield, Mo.
we have FRESH Salmon Fillets
on sale for $8.99 lb.

Healthy and delicious.

Try this recipe or search for one online that calls out to you!


This is a terrific low-effort weeknight dinner dish, and may just be my new favorite way to cook salmon. Braising is very quick (only 4 minutes for the fish!) and results in a moist and flavorful slice of fish.

Remember, Fresh is always best.

15-Minute Braised Salmon with Leeks
adapted from the World’s Healthiest Foods

Ingredients:

* 2 medium leeks cut lengthwise
* 4 medium cloves garlic, pressed
* 1 TBS chicken or vegetable broth + ½ cup
* 1 TBS fresh lemon juice – juice of 1 lemon, yum!
* 1 TBS fresh tarragon chopped
* 1½ lbs salmon fillet, cut into 8 pieces, skin and bones removed
* salt and white pepper to taste
* fennel leaves for garnish optional

Directions:

1. Cut off green tops of leeks and remove outer tough leaves. Cut off root and cut leeks in half, lengthwise. Fan out the leeks and rinse well under running water, leaving them intact. Cut into 2 inch lengths. Now, holding the leek sections cut side up, cut lengthwise ending up with thin strips, known as chiffonade cut. Make sure slices are cut very thin.
2. Let leeks and garlic sit for 5-10 minutes to bring out their hidden health benefits.
3. Heat 1 TBS broth in 10-12 inch stainless steel skillet. Sauté leeks over medium heat in broth for about 5 minutes stirring frequently. Add garlic and sauté for another minute. Add ½ cup broth, lemon juice and simmer for another 5 minutes, covered, stirring once in awhile.
4. Rub salmon with a little fresh lemon juice, salt and white pepper
5. Stir fresh tarragon, salt and pepper into leeks, and place salmon on top of leeks. Simmer for about 3-4 minutes, covered, or until salmon is pink inside. Time may vary a little depending on thickness of salmon. Serve leeks topped with salmon and drizzle with juice.

Serves 4

Enjoy!

Sunday, May 24, 2015

Savory Tomato & Gruyere Pie


To say this pie is delicious is a gross understatement. The words of wisdom here are: sometimes the simplest of recipes are the best. This pie is nothing fancy – it contains onions, lots of tomatoes, fresh basil, cheese, mayo and some hot sauce. All piled into a pie shell in layers.

And just so you know:
This recipe contains fat in the pie crust.
This recipe contains cheese (uh, yea, calories and fat)
This recipe contains mayonnaise (3/4 cup for the whole pie).
Other than that, it’s good for you – nice chunks of tomatoes.

I started off with a mixture of tomatoes (red and yellow heirlooms plus a small pile of smaller tomatoes right out of our garden. The heirlooms were very moist – VERY juicy. And that can be the slight undoing of this recipe – you’ve just got to get out as much of the liquid as possible. It’s not that the pie won’t be good, but the bottom shell will be soggy. But I have a “fix” for it – next time I’ll add an extra step. More on that later.

Obviously, first you have to make a pie shell.
Make it easy and pick up a prepared pie crust at Harter House.
 
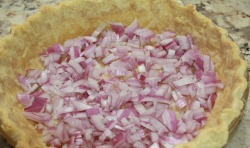
First went in the chopped raw red onions. Next time I’d chop them up finer AND I’d cook them a bit. The onions were still crunchy when we ate the tart after 40 minutes of baking.


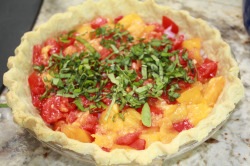
Next went in the chopped tomatoes that I’d drained on paper towels for about 15 minutes, AND I squeezed them to get out even more juice. I used about 3 1/2 cups for my large 9-inch pie plate.  
Then I sprinkled in about 1/4 cup of fresh sliced basil leaves from our garden.

Next I mixed up an equal quantity (approximately) of shredded Gruyere cheese and mozzarella (not fresh), along with some bottled mayonnaise and a dash of hot sauce. Using my hands I pressed the cheesy clumps all over the top of the pie. I didn’t mash it down or try to make it a solid layer – there were a few holes. But they all disappeared during baking. Bake for 25-40 minutes or so until the top is golden brown.
There it is, in all its gloriousness just out of the oven. We took it to our kids’ house and had it with some grilled Italian sausages and a delicious field greens salad topped with more garden-grown sliced tomatoes. Definitely eat it warm or hot. Next time I make this I’ll add a thin layer of cream cheese over the pastry – to keep the juice from water-logging the pie shell. And a word of caution: Gruyere is what I used here – it was beyond wonderful – but it’s a very salty cheese, so I might not add any additional salt. Mozzarella can also be very salty too.
The result? Oh gosh. Juicy. Creamy. Cheesy. Flaky. Tomato-y. All over perfection. Be sure to make this soon– before all the tomatoes are gone for the season.


Savory Tomato & Gruyere Pie
Recipe: Elise at Simply Recipes
Servings: 8 (maybe more like 6)
NOTES: NEXT TIME-I’ll spread a layer of light cream cheese (very softened) over the bottom and up the sides of the pie crust. It needs to be solid, otherwise the juice will leak through to the flaky pastry. If using Greyere, it’s a very salty cheese, so go very easy on the salt. Also, cook the onions just a little bit first.
1 whole pie shell — 9 inch
1/2 whole yellow or red onion — chopped finely
3 1/2 cups tomatoes — cut in half horizontally, squeezed to remove excess juice, roughly chopped, to yield 3 -4 cups
1/4 cup basil — sliced in thin strips
2 cups grated cheese — (combination of Gruyere and Mozzarella or sharp cheddar and Monterey Jack)
3/4 cup mayonnaise
1 teaspoon Tabasco sauce — (or more to taste)
Salt and freshly ground black pepper
Basil leaves for garnish
1 Preheat oven to 350°F. Place pie shell in oven and cook for 8-10 minutes or longer until lightly golden. If you are starting with a frozen crust, you’ll need to cook it a little longer. If you are using a homemade crust, freeze the crust first, then line the crust with aluminum foil and pre-bake it for 20 minutes, then remove the foil and bake an additional 10 minutes.

2 Squeeze as much moisture as you can out of the chopped tomatoes, using either paper towels, a clean dish towel, or a potato ricer. Squeeze gently in your hands, too, to get the last bit of juice out, without pulverizing the tomato flesh in the process.

3 Sprinkle the bottom of the pre-cooked pie shell with chopped onion. Spread the chopped tomatoes over the onions. Sprinkle the sliced basil over the tomatoes.

4 In a medium bowl, mix together the grated cheese, mayonnaise, Tabasco, a sprinkling of salt and freshly ground black pepper. The mixture should be the consistency of a gooey snow ball. Spread the cheese mixture over the tomatoes.

5 Place in oven and bake until browned and bubbly, anywhere from 25 to 45 minutes

Per Serving (and higher if you only serve 6 servings): 388 Calories; 33g Fat (74.2% calories from fat); 10g Protein; 16g Carbohydrate; 2g Dietary Fiber; 37mg Cholesterol; 450mg Sodium.