Sunday, September 28, 2025

Garlic Butter Baked Pork Chops with 2 sides


Garlic Butter Baked Pork chops are juicy, tender, and super flavorful thanks to the amazing butter sauce.

INGREDIENTS
2 medium sized Pork Chops
kosher salt and freshly ground pepper
4 Tablespoons butter - melted
1 Tablespoon fresh thyme - chopped
2 cloves garlic - minced
1 Tablespoon extra virgin olive oil

INSTRUCTIONS

  1. Preheat oven to 375 F.
  2. Season the pork chops with salt and pepper, and set aside.
  3. In a small bowl, mix together the butter, thyme, and garlic.  Set aside.
  4. In a cast iron skillet, heat olive oil over medium heat.
  5. When the skillet is really hot, add the pork chops.  Sear until golden, about 2 minutes per side.
  6. Pour garlic butter mixture over the pork chops.
  7. Place the skillet in the oven, and cook until the pork chops reach an internal temperature of 145 F, about 10-12 minutes.  The time depends on the thickness of the pork chops.*
  8. Remove from the oven.  Using a spoon, pour some of the butter sauce left in the skillet onto the pork chops before serving.

*  Insert the thermometer into the thickest part of the pork chop.


CRISPY ROASTED GREEN BEANS

INGREDIENTS
2 pounds green beans - trimmed
4 teaspoons extra virgin olive oil
1 teaspoon Italian seasoning
1/2 teaspoon garlic powder
1/2 teaspoon crushed red pepper
salt and fresh ground pepper

INSTRUCTIONS

  1. Preheat oven to 425 F
  2. Place a baking sheet in the oven for 10 minutes
  3. In a medium bowl, place the green beans and all the remaining ingredients.
  4. Mix well.
  5. Arrange the seasoned green beans in a single layer on the preheated baking sheet.
  6. Bake for about 8 minutes or until crisp tender.


ROASTED BUTTERNUT SQUASH MASH

INGREDIENTS
1 butternut squash
2 Tablespoons extra virgin olive oil
3 gloves garlic - minced
4 Tablespoons butter
Salt and black pepper
cayenne pepper for garnish

INSTRUCTIONS

  1. Preheat oven to 400 F
  2. Line a baking sheet with parchment paper or aluminum foil.  Set aside
  3. Wash and cut the butternut squash in half lengthwise.  Using a spoon, scoop out the seeds.
  4. Place both halves face up on the prepared baking sheet.
  5. Drizzle with olive oil and season with salt, pepper, and garlic.
  6. Roast in the oven for 45 - 60 minutes until fork tender.
  7. Remove the squash from the oven, and let cool for about 5 minutes.
  8. Using a large spoon, remove all of the squash flesh from the skin, and place it into a bowl for mashing.
  9. Add the butter, sea salt and pepper, and mash well until fluffy and smooth.  I like to use a hand mixer.
  10. Sprinkle with cayenne pepper and butter for extra flavor before serving.


Cream Cheese Filled Pumpkin Bread


Plenty of people wait all year long for September to roll around so they can have pumpkin spice everything.  But this bread is so delicious I think I can eat it year round.

This cream cheese filled pumpkin bread is wonderful because it’s not over-the-top decadent. It’s just sweet enough, and the creamy cream cheese filling makes it really special.
This pumpkin bread is just as pretty as it is scrumptious. That’s the mark of a great pumpkin dessert.

You will LOVE this delicious cream cheese filled pumpkin bread with your coffee in the mornings, and it’s fantastic to send along with your husband as a quick and easy to-go breakfast when he’s rushing out the door to work.
Your kids love this bread too.  Send a little piece in their lunch boxes this week.


 One important note: when you go to layer your batter and filling in the pan, you put 1/3 of the batter in, then the cream cheese filling, then the rest of the batter. Make sure that the first layer is only about 1/3 of the batter. If that first layer is too thick, the bottom of the bread won’t bake through properly.


Pumpkin Cream Cheese Bread
1 hour 15 minutes to prepare
serves 6-8


Ingredients

For the bread:
1 3/4 cups all-purpose flour
1 1/2 cups sugar
1 cup canned pumpkin (NOT pumpkin pie filling)
1/2 cup vegetable oil
2 eggs
2 teaspoons cinnamon
1 teaspoon baking soda
1/2 teaspoon ground nutmeg
1/4 teaspoon ground cloves
1/4 teaspoon allspice
1/4 teaspoon ground ginger
1/4 teaspoon salt


For the filling:

1 package (8 oz) cream cheese, softened
1/2 cup granulated sugar
1 tablespoon all-purpose flour
1 egg
1 teaspoon vanilla extract


Preparation
Preheat oven to 325°F and lightly grease a 9x5-inch loaf pan. Set aside.


For the bread:

In a medium bowl, beat together the oil, sugar, eggs, and pumpkin puree with an electric mixer on medium until well combined.
Add the cinnamon, baking soda, nutmeg, cloves, allspice, ginger, and salt, and mix until incorporated. Gradually add the flour and mix until just combined.

For cream cheese filling:
In a separate medium bowl, beat the cream cheese with an electric mixer on medium until smooth and creamy.
Add the egg, sugar, vanilla and flour, and mix until smooth and well-blended.
Pour 1/3 of the pumpkin batter into the prepared loaf pan. Spoon the cream cheese filling over the batter and spread it out evenly with a rubber spatula. Pour remaining 2/3 of the batter over the top.
Bake until a toothpick inserted into the center comes out clean, about 65-75 minutes. (The toothpick might have some cream cheese stuck to it.) If top and sides are looking too brown, tent the pan with foil for the last 15 minutes of baking.
Let cool in pan for 15 minutes before removing to a wire rack to cool completely. Enjoy!
 
From Dear Crissy.

Juicy Pork Tenderloin with Peppers and Onions


PREP
COOK
TOTAL
The trick to the best pork tenderloin is to sear the pork on all sides before roasting. In our recipe, the pork is browned on all sides and then baked on top a bed of onions and peppers. Most often, you will find pork tenderloins sold in packages with two tenderloins. One tenderloin should generously serve two people and will most likely serve three. One note, “pork tenderloins” and “pork loin” are two different cuts of meat. Pork tenderloins are much smaller and take less time to cook.
Makes 6 servings


You Will Need


2 pork tenderloins (about 1 1/2-pounds each)
1 tablespoon vegetable oil
1 tablespoon butter
2 medium onions, sliced
3 bell peppers, sliced
1 tablespoon minced garlic cloves (3 cloves)
1 tablespoon whole ground mustard or Dijon mustard
1 tablespoon chopped fresh thyme leaves
Salt and fresh ground pepper

Directions

Prepare Pork
Heat oven to 425 degrees F.
Trim each tenderloin of any silver skin (this can be tough when cooked). To do this, use a small sharp knife and slide the blade under and outward to remove it.
Pat pork dry with paper towels, and then season on all sides with one teaspoon of salt.
Heat the oil in a heavy-bottomed oven-safe skillet over medium heat. When the oil is hot and shimmers, add the pork tenderloins and cook, turning every few minutes, until evenly browned all over; 10 to 12 minutes. Transfer to a large plate or cutting board. (The pork will not be cooked through).

Prepare Peppers and Onions
Keep the pan used to sear the pork on the stove over medium heat. Add the butter. When the butter is melted and bubbling, stir in the onions then cook, stirring often, until they start to soften, about 5 minutes. Stir in the bell peppers, garlic, one teaspoon of thyme, and 1/4 teaspoon of salt. Cook, stirring every minute or so, for 5 more minutes.

To Finish
Use a pastry brush (or use your fingers) to rub the seared pork all over with the mustard, two teaspoons of thyme, and a generous amount of black pepper (1/4 to 1/2 teaspoon).

Place the seared pork tenderloins on top of the onions and bell peppers, and then slide the pan into the oven. Roast 15 to 20 minutes or until an internal thermometer inserted into the thickest part registers 145 degrees F. Transfer the pork to a large plate and cover with aluminum foil. Let rest about 5 minutes.

To serve, slice pork into 1-inch slices then serve on top of the onions and peppers.

Adam and Joanne's Tips

  • You need a large oven-safe skillet for this recipe. If you do not have one, you can brown the pork and partially cook the onions and peppers on the stove. Then, transfer the peppers and onions to a baking dish and place the pork on top.
  • Substitute the fresh thyme with 1 teaspoon of dried thyme.
  • Pork tenderloin doneness: We cook our pork to 145 degrees F. This means the pork will be barely pink in the middle, safe to eat, and ultra juicy. You can cook pork tenderloin to anywhere between 145 degrees F and 160 degrees F. Just keep in mind that keeping it as close to 145 degrees F will result in the juiciest, most tender piece of meat.


Chicken Thighs - Oven Baked


2 pounds chicken thighs
3 teas salt or to taste
1 teas Black Pepper or to taste

Sauce

2 tablespoons olive oil
1 Tablespoon whole grain Dijon Mustard
1 tablespoon mustard
2 tablespoons honey
6 cloves garlic, minced
1/4 teaspoon red pepper flakes


INSTRUCTIONS

Preheat the oven to 425 F degrees.

Place the chicken thighs in a bowl and season them generously with salt and pepper.

Whisk all the sauce ingredients together in a bowl.

Pour the over sauce over the thighs and toss them well.

Transfer the chicken thighs to a 9×13 inch baking dish including any remaining sauce. No need to grease the dish.

    Transfer the baking dish to the oven and bake for about 35 minutes or until the chicken thighs have an internal temperature of 165 F degrees and skin is crispy.
      Transfer the chicken to a serving plate, cover with aluminum foil and let it rest for 10 minutes before serving.
      NOTES

      1. Boneless skinless chicken thighs can also be used, but they will bake fast, they should only require 20 to 25 minutes in the oven.
      2. The honey mustard glaze is completely optional. For a simpler chicken thigh recipe, simply season the thighs with salt and pepper, drizzle a couple tbsp of olive oil in the baking dish and bake as instructed.
      3. When stored or wrapped well, this oven baked chicken is going to last in the fridge for up to 3 days. I recommend freezing it to extend its shelf life. When stored in a sealed airtight container, the chicken will last in the freezer for 4 – 6 months.

      This recipe comes from

      JoCooks.com

      See more information here.


      Saturday, September 20, 2025

      Ultra Moist Rum Cake – Buttery, Boozy, and Irresistibly Delicious!


      This isn’t just any cake—this is the kind of dessert that makes people close their eyes after the first biteUltra-moist, buttery, rich, and infused with vanilla and dark rum, this Rum Cake will instantly transport you to a sunny beach with a drink in hand.

      With a double dose of rum—in both the batter and the glaze—this cake is bursting with flavor and moisture. It’s sweet, slightly boozy, and so juicy that each bite practically melts in your mouth.

      Despite its bold flavor and elegant texture, it’s surprisingly easy to make. No complicated steps, no fancy equipment—just a simple batter, a rich rum soak, and a bit of patience while it cools.

      Perfect for the holidays, a celebration, or simply when you’re craving something a little indulgent, this homemade rum cake recipe is a total crowd-pleaser. Go ahead, make it today—you don’t need a special occasion to enjoy this island-inspired classic!

      Ingredients:
      flour- 2 cups
      Sugar- 1 1/2 cups
      1 stick of softened or melted butter
      Instant vanilla pudding- 1/2 cup (1 package)
      Baking powder- 2 teaspoons
      Salt- 1 teaspoon
      Vegetable oil- 1/2 cup
      Milk- 1/2 cup of
      eggs- 4 large
      Dark rum- 1/2 cup of
      Butterscotch schnapps- 1/4 cup of
      Orange bitters- 1 tablespoon

      Steps:

      1 ) Add all the ingredients to a large mixing bowl and blend on medium for 5 to 7 minutes.

      2 ) Grease a Bundt cake pan with cooking spray or butter and coat with flour.
            A Bundt pan is traditional and works best for even baking and an elegant look.

      3 ) Pour all the mixture in to the Bundt cake pan and place in a preheated oven in the middle rack at 325 degrees Fahrenheit for 50 to 55 minutes, or until a skewer can be inserted in to the middle of the cake and be removed without any residue.

      For the rum sauce topping:

      Ingredients:

      1 stick of butter
      1/4 cup of water
      1 cup of sugar
      1/2 cup of dark rum
      Zest from 1 orange peel


      Steps:

      1 ) Add your sugar, butter, and water to a medium size cooking pan and bring to a boil. Once the butter has melted and the mixture begins to boil, place your orange zest in to a metal strainer and place over the top of the boiling mixture for about 5 minutes.

      2 ) Use a spoon to press down on the zest when you’re done to remove the oils from the orange peel.

      3 ) Once the cake is finished, test it with a skewer to make sure it’s cooked all the way through. Poke holes throughout the entire cake to allow the rum mixture to soak in better. Slowly pour your mixture over the top of the cake. Don’t pour it all at once. Pour a little, allow it to soak and repeat that process until you’ve used it all.

      4 ) Allow the cake to completely cool, then insert a knife around the edges of the bundt cake and around the middle to loosen the cake from the pan. Place a large plate over the top of the Bundt cake pan and flip it over. Give it a minute and remove the pan. Serve and enjoy!


      Note: Make sure you make your rum sauce topping close to the time your cake is finished cooking. If you make it too early you will develop a film over the top of the mixture as it cools.

      Pro Tips for the Best Rum Cake

      Use Good-Quality Rum
      • Dark or spiced rum, like Myers’s, Captain Morgan, or Bacardi Black for the richest flavor. Don’t use anything labeled “cooking rum.”  
      Soak It Well
      • Let the cake sit for several hours (or overnight) after adding the glaze to fully absorb the rum and vanilla goodness.
      Use Real Butter
      • Butter makes the cake rich and flavorful. Margarine or oil just won’t do it justice.
      Grease the Pan Generously
      • Rum cakes are notorious for sticking. Use butter and flour, or a baking spray with flour for the best release.
      Add Nuts for Texture (Optional)
      • Chopped pecans or walnuts in the bottom of the pan add crunch and look gorgeous when the cake is flipped.
      Poke Holes in the Cake Before Glazing
      • This helps the buttery rum glaze seep into every bite of the cake.
      Let It Rest
      • The flavor intensifies and the texture improves after a day or two. It’s even better the next day!

      How do I keep it moist?

      • The rum glaze keeps the cake ultra-moist—store it tightly covered at room temperature.

      Can I make this ahead of time?

      • Yes! This cake gets better as it sits. Make it 1–2 days ahead for best results.

      FROM


      Friday, September 19, 2025

      The Great Pumpkin Dessert


      Canned pumpkin and cake mix make these bars an effortless alternative to pumpkin pie. It's a tried-and-true dessert that always brings big smiles. —Linda Guyot, Fountain Valley, California


      Ingredients

      1 can (15 ounces) solid-pack pumpkin
      1 can (12 ounces) evaporated milk
      3 large eggs
      1 cup sugar
      4 teaspoons pumpkin pie spice
      1 package yellow cake mix (regular size)
      3/4 cup butter, melted
      1-1/2 cups California Walnuts

      Vanilla ice cream or whipped cream

      Directions
      In a large bowl, beat first five ingredients until smooth.
      Transfer to a greased 13x9-in. baking dish. Sprinkle with cake mix and drizzle with butter. Top with walnuts.
      Bake at 350° for 1 hour or until a knife inserted in the center comes out clean. Serve with ice cream or whipped cream.

      Test Kitchen Tips 
      If you don’t have pumpkin pie spice, you can substitute 2 teaspoons of cinnamon, 1 teaspoon ginger, 1/2 teaspoon nutmeg and 1/2 teaspoon ground cloves or allspice.

      Unless otherwise specified, Taste of Home recipes are tested with lightly salted butter. Unsalted, or sweet, butter is sometimes used to achieve a buttery flavor, such as in shortbread cookies or buttercream frosting. In these recipes, added salt would detract from the buttery taste desired.
      Nutrition Facts
      1 piece: 385 calories, 21 g fat (8 g saturated fat), 70 mg cholesterol, 326 mg sodium, 44 g carbohydrate (30 g sugars, 3 g fiber), 8 g protein. 

      Beer Can Grilled Chicken


      4 lb. Chicken
      Chicken Rub
      Vegetable or Olive Oil
      12 oz. Beer, your choice


      Beer Can Chicken Rub

      2 tablespoons smoked paprika
      2 tablespoons salt
      2 tablespoons onion powder
      1 tablespoon cayenne pepper
      1 tablespoon ground cumin
      2 teaspoons dried thyme
      2 teaspoons dried oregano
      2 teaspoons black pepper
      2 teaspoons garlic powder


      For the chicken rub;
      In a small bowl mix all the ingredients together and use for the grilled chicken.
      Preheat your grill to medium high heat.  (350 degrees)
      Rub the chicken and the cavity down with vegetable oil. Season the chicken and cavity with rub mixture.  Pour off (drink) 1/4 of the beer and sit the chicken on top of the beer can.  Place the chicken in the center of the hot grill and cover.  Cook the chicken for 1 to 1 1/2 hours, or until the instant read thermometer reads 165 degrees F.  Once cooked, cover loosely with foil and let rest for 10 minutes before carving.


      NOTE  This recipe can also be made in the oven.

      Chicken Alfredo Baked Ziti


      Creamy alfredo sauce, savory chicken, hearty pasta,
      two delicious kinds of melty cheese — what’s not to love?!
      There’s a reason why this one will always be a classic.

      Ingredients

      Chicken Baked Ziti Ingredients:

      • 12 ounces uncooked ziti (or any pasta shape)
      • 2 cups shredded, cooked chicken (about 2 small chicken breasts)
      • 1 batch alfredo sauce (see below)
      • 1 1/2 cups shredded part-skim mozzarella cheese
      • toppings: lots of freshly-grated Parmesan cheese, finely-chopped fresh basil or parsley

      Alfredo Sauce Ingredients:

      • 1 tablespoon olive oil or butter
      • 4 cloves garlic, minced
      • 3 tablespoons all-purpose flour
      • 1 cup chicken or vegetable stock
      • 1 cup low-fat milk
      • 3/4 cup freshly-grated Parmesan cheese
      • 1/2 teaspoon salt
      • 1/4 teaspoon black pepper


      Instructions

      To Make The Chicken Baked Ziti:

      1. Preheat oven to 375°F.  Mist a 9 x 13-inch baking dish with cooking spray; set aside.
      2. Cook the pasta al dente in a large stockpot of well-salted boiling according to package instructions. Drain. Return pasta to the stockpot and add chicken and alfredo sauce. Gently toss to combine until the pasta is evenly coated.
      3. Pour half of the pasta into the prepared baking dish. Sprinkle evenly with 1 cup of cheese. Layer the remaining half of the pasta evenly on top. Sprinkle evenly with the remaining 1/2 cup of cheese.
      4. Bake for 20-25 minutes until the cheese is melted and just barely starts to turn golden. Remove and serve immediately, sprinkled with additional toppings if desired.

      To Make The Alfredo Sauce:

      1. Heat olive oil in a large sauce pan over medium-high heat. Add garlic and saute one minute, stirring occasionally, until fragrant. Sprinkle with flour, and stir to combine. Saute for an additional minute to cook the flour, stirring occasionally.
      2. Slowly add chicken broth, whisking to combine until smooth. Whisk in milk, and bring the mixture to a simmer. Let cook for an additional minute until thickened, then stir in Parmesan cheese, salt and pepper until the cheese melted. Remove from heat and set aside.

      Possible Variations:

      There are so many ways to customize this chicken alfredo bake!  For example, feel free to…
      • Add in veggies. Broccoli, asparagus, mushrooms, cauliflower, and any number of other veggies would be delicious added to this chicken alfredo recipe.  Just note that they won’t get cooked much during the 20 minutes of baking time.  So if whatever veggies you add require a longer cooking time, feel free to toss them into the boiling water with the pasta for a few minutes or sauté (or roast) them for a few minutes before adding them to the casserole.
      • Add in extra Italian herbs. If you would like an herbier chicken alfredo pasta, feel free to add some dried Italian Seasoning or chopped fresh Italian herbs into the alfredo sauce.  (Or, you can also sprinkle some chopped fresh basil on top of the pasta after baking.)
      • Nix the protein.  Not into chicken?  Feel free to use shrimp in this recipe instead.  (Or make it vegetarian and add in some extra veggies instead.)
      • Make it spicy. I really love sprinkling lots of crushed red pepper into (and on top of) this casserole to give it a bit of a kick.
      • Make it cajun. To give this recipe a Cajun twist, feel free to stir 1-2 tablespoons Cajun seasiing (to taste) into the alfredo sauce.
      • Make it gluten-free.  Just use your favorite certified gluten-free pasta, and my gluten-free alfredo sauce recipe.

      This recipe comes from GimmeSomeOven.com


      Sunday, September 14, 2025

      Boneless Pork Ribs


      Boneless Pork Ribs, also known as Country Style Ribs. are the easiest, meatiest ribs you'll ever eat.

      What are commonly referred to as boneless ribs are actually a cut of pork shoulder that is then cut into rib like pieces.  The meat is super marbled for a delicious full flavor and super tender if cooked the right way... which is low and slow.

      How to make the boneless ribs;
      Season the ribs with dry rub.  Massage the rub into all sides of the pork.
      Place the ribs into a baking dish.  


      Cover with foil and place into a low even for several hours.
      Cook the ribs at 300 degrees.
      Once the ribs are tender enough to cut easily with a fork, you'll want to uncover them and drain away the juices from the pan.


      Brush the ribs with your favorite BBQ sauce and bake for an additional 30 - 45 minutes uncovered.  or leave them as they are.  They will literally melt in your mouth after letting them caramelize in this last bake.


      HAWAIIAN BBQ SAUCE
      HULI SAUCE

      Hawaiian BBQ sauce is super easy to make and yields a sticky glaze with hints of teriyaki from the fresh flavors of pineapple, soy sauce ginger and garlic. Tropical flavors that work great on any grilled chicken, pork or wonderful on beef ribs for entertaining!

      INGREDIENTS
      1/3 cup Ketchup
      1/3 cup Brown Sugar
      1/4 cup Soy Sauce
      1/4 cup Pineapple Juice
      2 Tablespoons Sesame Oil
      4 Garlic Cloves, Grated  or minced fine
      1" Fresh Ginger, grated 
      1 Teaspoon Rice Vinegar
      2 Tablespoons Chili Garlic Sauce
      INSTRUCTIONS
      1. Grate garlic or chop to a very fine mince.
      2. Peel 1" of a piece of fresh ginger, then grate. 
      3. Place all ingredients into a pan and stir to mix well.
      4. Bring to a boil and stir constantly until thickened and reduced, about 5 minutes once boiling
      5. Store in airtight container up to a week.
      6. Can be used as a marinade or brushed on while grilling or baking.
      7. Reserve some sauce to serve on the side for people to be able to apply at the table themselves.

      This teriyaki glaze comes together in mere minutes.
      It's best if you heat it for just 5 minutes  to help the brown sugar dissolve and reduce it just a bit.

      Mandarin Shrimp Pasta


      This recipe came from one of my business associates,
      Jan O'Rear.  Jan brought it and served it cold at a social event.

      This a one of my favorites!  ~Shelly


      INGREDIENTS
      1 pound raw shrimp, shells removed
      1 cup Italian dressing, divided
      1 tablespoon peanut butter
      1 tablespoon soy sauce
      1 tablespoon honey
      1 inch ginger root, peeled and grated
      1/2 teaspoon red pepper flakes
      1 tablespoon canola oil
      1 tablespoon sesame oil
      1 medium carrot, peeled and grated
      6 green onions, chopped
      3 tablespoons finely chopped cilantro
      1 8-ounce can mandarin oranges, drained
      8 ounce package almond silvers or sliced almonds, toasted (see instructions below)
      3 cups angel hair pasta, cooked

      INSTRUCTIONS
      1. Marinate shrimp in refrigerator for 1 hour in 1/3 cup of Italian dressing; drain shrimp after 1 hour.
      2. While the shrimp is marinating, in a separate bowl, whisk together the remaining Italian dressing, peanut butter, soy sauce, honey, grated ginger root and red pepper flakes. Set sauce aside. 
      3. Toast almonds in a dry pan for 4 minutes, in a preheated 350 degree oven. Set aside.
      4. Boil pasta according to package directions, drain and set aside.
      5. Saute the grated carrots, chopped green onions and chopped cilantro in the canola oil with the sesame oil until browned.  
      6. Add the shrimp and saute until the shrimp are pink and opaque.
      7. Combine pasta, vegetables, shrimp and sauce in a large saute pan and heat thoroughly, stirring continually, until heated through.
      8. Garnish with toasted almonds and mandarin oranges.
      9. Serve hot or cold.


      For a variation, substitute 1 lb. boneless chicken breast cut into 1-inch pieces for the shrimp and add (1) 8 oz. can of sliced water chestnuts is desired.

      Shelly's Green Tomato Relish


      Is it just me or is Sunday made for cooking? This past week I picked up about 20 green tomatoes at the Farmers Market.   I LOVE green tomato relish. I used to help my mother-in-law make it every fall in her kitchen, using a recipe handed down from her mother and grandmother. We would use a food grinder and it was really messy. Today I use a food processor and, although I am still a pretty messy cook, the process is way faster and easier.

      Here is my recipe, which is cut down from the original.

      Green Tomato Relish
      20 Green Tomatoes
      3 Large Red Peppers
      3 Large Green Peppers
      2 Large Onions

      Grate vegetables in a food processor. Cook slow about 15 minutes. Drain if too much juice.

      In another pot, mix together and bring to a boil;
      2 Cups Cider Vinegar
      3 Cups Sugar
      1 TBL Salt
      ½ Tsp ground Cloves
      ½ Tsp Allspice
      ½ Tsp Cinnamon
      ½ TBL Mustard Seed
      ½ TBL Celery Seed
      (I really love spicy relishes also and always consider adding Jalapenos, but then I don’t. I bet it would be really good though, if you like sweet and spicy)

      Add to Vegetable mixture and boil another 15 minutes.

      I have Mason Jars and we sell Mason Jar LIDS at Harter House. (At least for sure at 1500 E. Republic Road)

      I boiled the jars to sanitize them. Then filled them full with the relish mixture. My Mother-In-Law always let the full jars stand upside down on the counter to cool, to help seal the jars. So I will do that also, because that’s the way I learned. My kitchen smells SO GOOD! A mixture of sweet and sour.

      And Barbara Kauffman, you’ve got a big jar of Shelly’s Homemade Green Tomato Relish with your name on it!

      This batch really made a lot too. Three large jars, three medium jars and three small jars with just a bit more that we will serve with dinner tonight. Jars do not need to be refrigerated till opened.


      By the way, our dinner tonight is Harter House Baby Back Pork Ribs.


      Marinated Chuck Roast

      It's always nice to find new recipes for products that are on sale, and this week at Harter House Supermarket, we have Chuck Roast On Sale for $8.99 lb. (Sept 17-23, 2025)


      I saw this on a PTITChef Blog, and she said that her friends, that are not big beef eaters, really raved about this. She said it was the very best roast she has ever eaten also.

      "A rich marinade deepens the mahogany color. But the flavor! Oh, the flavor is amazing, getting into the very corners of your mouth ~ slightly sweet and tangy, slightly winey, and tender good."

      I can't wait to try it!!


      Marinated Chuck Roast


      3 to 4 pounds. chuck roast
      1 teaspoon black pepper
      1/2 teaspoon tarragon (can substitute Anise seed)
      1/3 cup rice vinegar
      1/4 cup ketchup
      2 tablespoon olive. oil
      1/2 cup brown sugar
      3 tablespoons soy sauce
      1 tablespoon Worcestershire sauce
      1 teaspoon prepared mustard
      1 teaspoon salt
      1/4 teaspoon garlic powder (or fresh sliced garlic)
      1/2 cup red cooking wine
      8 small mushrooms ( I recommend Shittake mushrooms)
      1 tomato, sliced


      Directions
      Preheated 350 degrees oven.

      In a small bowl, combine all ingredients, except tomatoes, to make the marinade.
      Salt and pepper both sides of the roast and then place roast in glass pan.
      Pour the marinade over the roast.
      Cover, refrigerate and allow meat to marinate at least 3 to 4 hours. Spoon marinade over roast from time to time.
      Just before roasting, slice the tomato and place on top of the roast.
      Roast at 350 degrees for one hour.

      Doesn't this look delicious!

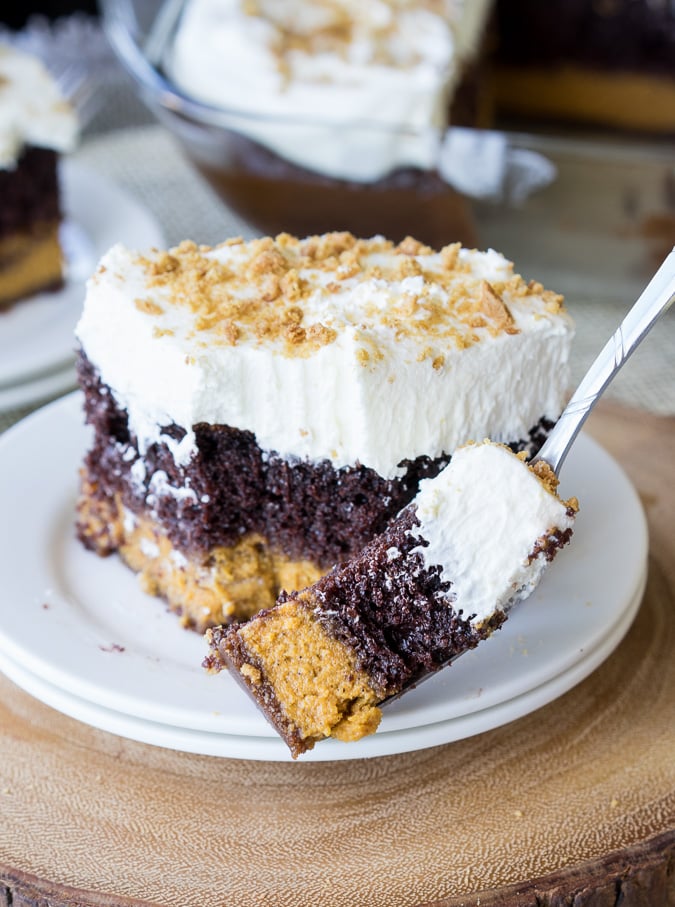
      Chocolate Pumpkin Magic Cake


      Chocolate Pumpkin Magic Cake


      Chocolate Pumpkin Magic CakeMy very good friend, Theresa, served this cake to us for dessert.  I was hooked.  I knew I would share it in my weekly newsletter.  It is amazing.  ~Shelly


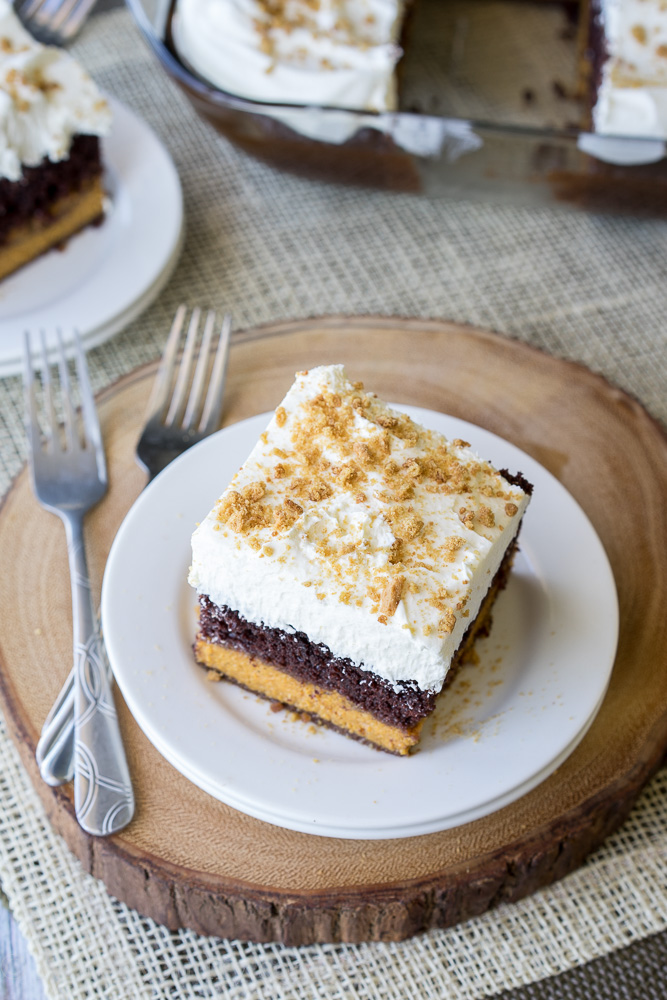
      She told me this triple layer dessert is extremely easy to make, and comes out in perfect layers each time!

      The bottom layer is a delightful pumpkin pie, the middle is a rich chocolate cake and then it’s topped off with a vanilla pudding frosting that is to die for.

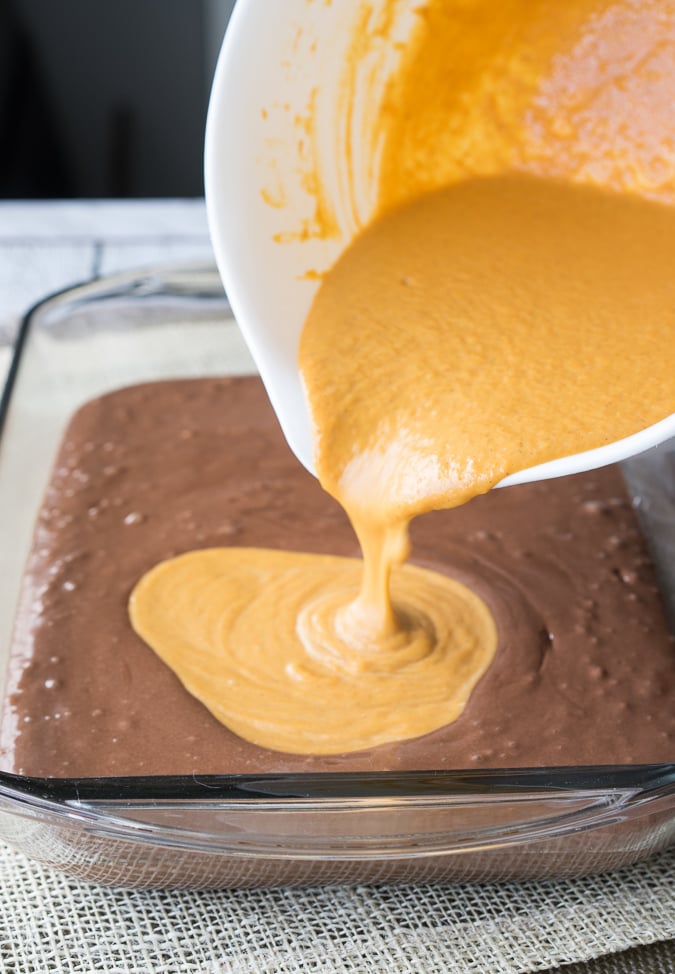
      The secret to this magical cake is how you bake it.
      First you pour in the chocolate cake batter and then the pumpkin pie batter over the top.

      Since the pumpkin pie filling is heavier, it will sink to the bottom and the cake will rise to the top.

      Now… she got asked a lot, “Why don’t you just put the pumpkin on the bottom to begin with?” 
      The pumpkin needs to bake longer in order to set, this little trick makes it so both the cake and pie come out perfect!

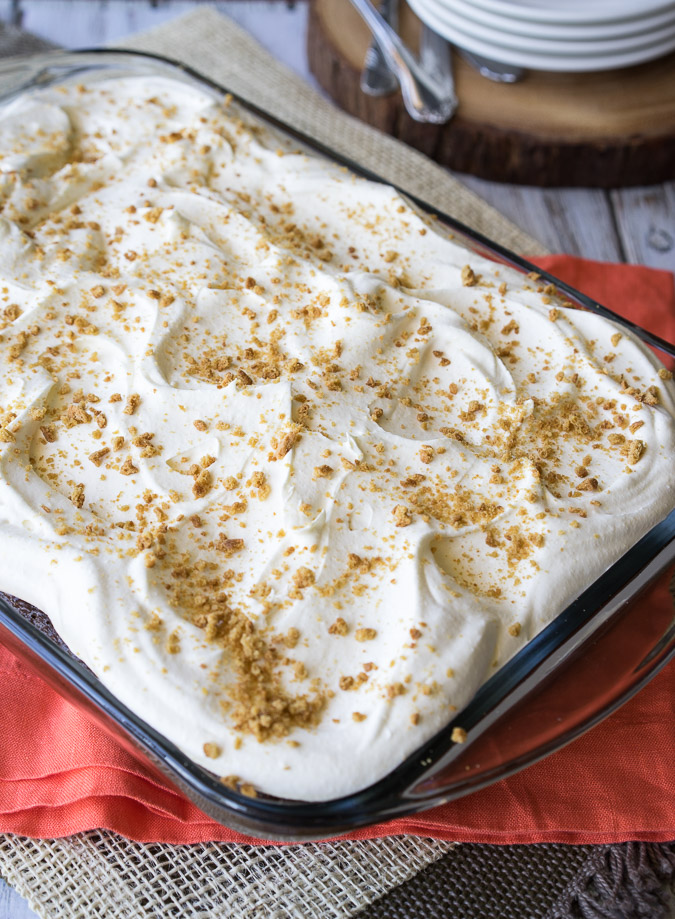
      On the original pumpkin magic cake, the frosting had a hint of pumpkin pie spice, but you can opt to sprinkle some crushed gingersnap cookies on top.

      Chocolate Pumpkin Magic CakeOnce your family tastes this cake… they’ll be hooked and asking for it all the time!


      Grab a fork and dig in to this chocolate delight!

      Ingredients
      For the Cake:
      1 box of devil's food cake mix PLUS ingredients needed to make (eggs, water, oil)
      For the Pumpkin Pie:
      1 (15oz) can Pumpkin Puree
      1/2 cup evaporated milk
      1/2 cup heavy cream
      3 eggs
      1 cup brown sugar
      1 tsp pumpkin pie spice
      For the Frosting
      1 (4 serving size) box vanilla instant pudding mix
      1 cup cold milk
      8 oz Cool Whip, thawed
      4 to 5 gingersnap cookies, crushed into crumbs
      Instructions
        Chocolate Pumpkin Magic Cake
      1. Preheat oven to 350 degrees F.
      2. Prepare box of cake mix according to package instructions, then pour into a lightly greased 9"x13" cake pan. DO NOT BAKE. Set aside.
      3. In another bowl whisk together the ingredients for the Pumpkin Pie (pumpkin, evaporated milk, cream, eggs, brown sugar, and pumpkin pie spice), until smooth. Slowly pour the pumpkin pie mixture all over the cake mix.
      4. Carefully place cake into the oven and bake for 50-60 minutes or until the center is no longer jiggly, and a toothpick inserted into cake mix comes out clean. Let cool to room temperature.
      5. For the Frosting:
      6. Place the vanilla pudding mix into a large bowl and pour in the cold milk. Whisk until combined and starting to thicken. Gently fold in the Cool Whip until it's completely combined. Spread on top of the cooled cake then sprinkle with the crushed gingersnap cookies.
      7. You can serve now, or chill the cake, and serve when chilled. Either way tastes great. Enjoy!

      Sunday, September 7, 2025

      Best Beef Stroganoff


      I never get tired of this recipe!  ~Shelly


      Ingredients

      1.2 lb boneless rib eye or tenderloin
      2 tbsp vegetable oil , divided
      1 large onion (or 2 small onions), sliced
      10 oz mushrooms , sliced (not too thin)
      3 tbsp butter
      2 tbsp flour 
      2 cups beef broth, preferably salt reduced
      1 tbsp Dijon mustard
      2/3 cup sour cream
      Salt and pepper

      Serving:

      8 - 10 oz pasta or egg noodles of choice (Note 3)
      Chopped chives , for garnish (optional)

      Instructions

      • Use your fist (or rolling pin or mallet) to flatten the steaks to about  1/3" thick. Slice into  1/5" strips (cut long ones in half), discarding excess fat.
      • Sprinkle with a pinch of salt and pepper.
      • Heat 1 tbsp oil in a large skillet over high heat. Scatter half the beef in the skillet, QUICKLY spread it with tongs. Leave untouched for 30 seconds until browned. Turn beef quickly (as best you can!). Leave untouched for 30 seconds to brown. Immediately remove onto a plate. Don't worry about pink bits and that it will be raw inside.
      • Add remaining 1 tbsp oil and repeat with remaining beef.
      • Turn heat down to medium high. Add butter, melt. Then add onions, cook for 1 minute, then add mushrooms.
      • Cook mushrooms until golden. Scrape bottom of fry pan to get all the golden bits off (this is flavor!).
      • Add flour, cook, stirring, for 1 minute.
      • Add half the broth while stirring. Once incorporated, add remaining broth.
      • Stir, then add sour cream and mustard. Stir until incorporated (don't worry if it looks split, sour cream will "melt" as it heats).
      • Bring to simmer ,then reduce heat to medium low. Once it thickens to the consistency of pouring cream (3 - 5 minutes), adjust salt and pepper to taste.
      • Add beef back in (including plate juices). Simmer for 1 minute, then remove from stove immediately. (Note 4)
      • Serve over pasta or egg noodles, sprinkled with chives if desired.

      Notes

      1. Best cut of beef for stroganoff - use decent to good quality quick cooking cut of beef such as:
      • boneless rib eye 
      • beef tenderloin
      • boneless sirloin, sirloin steak tips
      I don't recommend: beef round steak (aka topside), skirt, flat iron, 
      Pork can also be used - pork stroganoff is found in Russia too.

      2. Flour - any is fine here, I use plain white flour (all purpose).  Or use 1 TBL. corn starch.

      3. Serving - I like serving this with short pastas, rather than long pastas. Easier to eat. It's also great with mashed potato, rice, polenta - anything that's suitable to slop up all that gravy!

      4. Sauce thickness: You can make sauce thinner with touch of water if you want, but DO NOT keep simmering to thicken once the beef is added, it will overcook the beef.

      5. Storage - 3 to 4 days in the fridge, also freezes fine. Thaw fully then reheat carefully, being sure not to overcook the beef!
      I found this recipe at;RecipeTinEats

      Grilled Ribeye Steak with Cabernet Mushrooms


      This recipe for Grilled Ribeye Steak with Cabernet Mushrooms is the last of the incredible grilled steak recipes Chef Brandon Douglas taught participants at the “Sizzling Summer Steaks” event that was part of the “Made from Scratch” cooking classes in 2013 at the Winrock Institute on Petit Jean Mt.


      Chef Douglas says the ribeye is his favorite steak cut because of the wonderful marbling of fat this cut features compared to leaner cuts of beef steak. He says the fat adds to the sweet, rich flavor of this recipe. He combined sliced baked sweet potato wedges when he plated the finished steak and mushroom sauce.


      Ingredients
      • 1 cup dry cabernet sauvignon
      • 2/3 cup green onion sliced in rounds
      • 1/4 cup extra-virgin olive oil, plus 2 tablespoons for garnish
      • 3 teaspoons fresh rosemary leaves, chopped; plus sprigs for garnish
      • 2 garlic cloves, crushed
      • 1 teaspoon salt
      • 1/4 cup balsamic vinegar
      • 1/2 cup demi glaze or Beef stock
      • 1/2 cup sugar
      • 1/2 teaspoon freshly ground black pepper
      • 4 Harter House Ribeye Steaks, 1-1/2 inches thick
      • your favorite mushrooms, rough chopped or whole
      • Baked Sweet Potato (Optional)
      Directions
      1. Make small cuts with knife into fat around the edge of steaks. Rub with your favorite seasoned salt steak rub and pepper. Refrigerate for 30 minutes to an hour.
      2. Clean grill grate and preheat grill to high heat.
      3. Place steaks on hot grill for three minutes on each side to sear. Reduce grill temperature to low and close the lid. Continue cooking steaks an additional five to 10 minutes for medium-rare, turning halfway through. Let steaks rest for five minutes before serving.
        OPTION - cook till Medium Rare on the grill.
      4. As steaks cook, add olive oil to saute’ pan. Add mushrooms, garlic and saute’ until mushrooms become tender. Excluding green onions, add remaining ingredients and reduce until sauce forms. Adjust seasoning with salt and pepper.
      5. Pour on top of finished steak. Garnish with green onions and remaining olive oil. Serve with baked sweet potato.