Sunday, January 26, 2025

Chicken Parmigiana


Tender pieces of chicken, topped with homemade tomato sauce and grated cheese, and then oven baked until the cheese is golden and melted. The tomato sauce and crumbed, uncooked chicken can be prepared in advance but it is best to cook the chicken and assemble the dish just before it goes into the oven.

Tomato Sauce
Makes about 1 1/3 cups.

1 tablespoon oil
1/2 medium onion, peeled and finely chopped
2 large garlic cloves, peeled and crushed
1 can crushed/diced tomatoes
1/2 teaspoon dried basil
1 1/2 teaspoons brown sugar, firmly packed
Salt and pepper


Crumbed Chicken
Approximately 1 lb skinless chicken breast fillets or tenderloins
2 eggs
1 tablespoon milk
1/3 cup plain flour
about 1 1/3 cups packaged breadcrumbs
about 1/2 cup oil, for frying


Cheese Topping
1 1/3 cups, firmly packed grated mozzarella cheese
1/2 cup, lightly packed grated cheddar cheese
1/4 cup grated parmesan cheese

Heat oil in a heavy-based medium saucepan over medium heat. Add onion and garlic and cook, stirring occasionally, for about 5 minutes, until onion has softened but not browned. Add tomatoes, basil and brown sugar, increase heat and bring to the boil. Once boiling, reduce heat and simmer for about 35-40 minutes, stirring occasionally, until sauce has reached the desired consistency. Add salt and pepper to taste. Set aside for 10 minutes, and then puree sauce in a blender or food processor.

If using chicken breasts, cut them in half horizontally. Cover chicken with a freezer bag and lightly pound with the flat side of meat mallet to flatten. © 


Whisk eggs and milk together in a bowl. Coat one piece of chicken in flour and shake to remove excess. Then dip the chicken into the egg and milk mixture ensuring that all of the flour is moistened.


Then coat the chicken in breadcrumbs, pressing firmly to ensure crumbs adhere. Repeat with remaining pieces of chicken.

To fry chicken, heat some of the oil in a heavy-based frying pan over medium-high heat. We cook the chicken in two batches using 1/4 cup of oil for each batch (the number of batches will be determined by the size of your frying pan and you'll need to divide the oil evenly between each batch). Fry the chicken in a single layer, without overcrowding the pan, until golden brown and cooked through.

Wipe the pan out with paper towels between each batch of chicken to remove any crumbs. This prevents the overcooked loose crumbs adhering to the next batch of chicken.

Drain cooked chicken on paper towels.

Place cooked chicken in a large baking dish and spread with sauce. Sprinkle with combined cheeses.


Bake at 400 degrees Fahrenheit for about 15-20 minutes, or until cheese is melted and golden.  Optional. sprinkle the chicken parmigiana with chopped parsley before serving.

Best Beef Stroganoff


I never get tired of this recipe!  ~Shelly


Ingredients

1.2 lb boneless rib eye or tenderloin
2 tbsp vegetable oil , divided
1 large onion (or 2 small onions), sliced
10 oz mushrooms , sliced (not too thin)
3 tbsp butter
2 tbsp flour 
2 cups beef broth, preferably salt reduced
1 tbsp Dijon mustard
2/3 cup sour cream
Salt and pepper

Serving:

8 - 10 oz pasta or egg noodles of choice (Note 3)
Chopped chives , for garnish (optional)

Instructions

  • Use your fist (or rolling pin or mallet) to flatten the steaks to about  1/3" thick. Slice into  1/5" strips (cut long ones in half), discarding excess fat.
  • Sprinkle with a pinch of salt and pepper.
  • Heat 1 tbsp oil in a large skillet over high heat. Scatter half the beef in the skillet, QUICKLY spread it with tongs. Leave untouched for 30 seconds until browned. Turn beef quickly (as best you can!). Leave untouched for 30 seconds to brown. Immediately remove onto a plate. Don't worry about pink bits and that it will be raw inside.
  • Add remaining 1 tbsp oil and repeat with remaining beef.
  • Turn heat down to medium high. Add butter, melt. Then add onions, cook for 1 minute, then add mushrooms.
  • Cook mushrooms until golden. Scrape bottom of fry pan to get all the golden bits off (this is flavor!).
  • Add flour, cook, stirring, for 1 minute.
  • Add half the broth while stirring. Once incorporated, add remaining broth.
  • Stir, then add sour cream and mustard. Stir until incorporated (don't worry if it looks split, sour cream will "melt" as it heats).
  • Bring to simmer ,then reduce heat to medium low. Once it thickens to the consistency of pouring cream (3 - 5 minutes), adjust salt and pepper to taste.
  • Add beef back in (including plate juices). Simmer for 1 minute, then remove from stove immediately. (Note 4)
  • Serve over pasta or egg noodles, sprinkled with chives if desired.

Notes

1. Best cut of beef for stroganoff - use decent to good quality quick cooking cut of beef such as:
  • boneless rib eye 
  • beef tenderloin
  • boneless sirloin, sirloin steak tips
I don't recommend: beef round steak (aka topside), skirt, flat iron, 
Pork can also be used - pork stroganoff is found in Russia too.

2. Flour - any is fine here, I use plain white flour (all purpose).  Or use 1 TBL. corn starch.

3. Serving - I like serving this with short pastas, rather than long pastas. Easier to eat. It's also great with mashed potato, rice, polenta - anything that's suitable to slop up all that gravy!

4. Sauce thickness: You can make sauce thinner with touch of water if you want, but DO NOT keep simmering to thicken once the beef is added, it will overcook the beef.

5. Storage - 3 to 4 days in the fridge, also freezes fine. Thaw fully then reheat carefully, being sure not to overcook the beef!
I found this recipe at;RecipeTinEats

Peanut Butter Bars with Salted Chocolate Ganache

This recipe comes from Nancy at foodnetwork.com

It's an easy recipe to make and yields 16 squares.


Ingredients


Nonstick cooking spray, for baking dish
1 1/2 cups confectioners' sugar 
1 1/2 cups graham cracker crumbs 
1 cup creamy peanut butter 
Kosher salt 
1 stick (8 tablespoons) unsalted butter, melted 
8 ounces semisweet baking chocolate, chopped into small pieces 
1 cup heavy cream 
1 teaspoon flaky sea salt, optional

Directions


  1. Coat the bottom and sides of an 8-by-8-inch baking dish with nonstick spray.
  2. In a large bowl, stir to combine the confectioners' sugar, graham cracker crumbs, peanut butter, 1/8 teaspoon salt, and melted butter. Press the mixture into the prepared baking dish and set aside.
  3. Place the chocolate and 1/8 teaspoon salt in a medium bowl. Heat the cream in a small saucepan until bubbles start to form around the edges. Pour the cream over the chocolate, let sit for 1 minute and then whisk until completely melted and smooth.
  4. Pour the ganache over the peanut butter mixture and refrigerate until the chocolate is cooled and set, at least 45 minutes and up to overnight.
  5. Sprinkle evenly with the flaky sea salt. Cut into squares to serve.


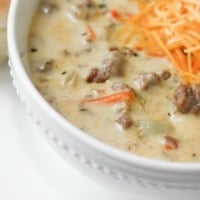
Cheeseburger Soup


INGREDIENTS
1 pound Harter House Ground Chuck 
¾ cup chopped onion
¾ cup shredded carrots
¾ cup diced celery
1 teaspoon dried basil
1 teaspoon dried parsley flakes
4 tablespoons butter, divided
3 cups chicken broth
4 cups peeled and diced potatoes
¼ cup all purpose flour
2 cups of Velveeta processed cheese cubed (16 ounce) OR 2 cups shredded cheddar cheese
1½ cups milk
¾ teaspoon salt
¼ to ½ teaspoon pepper
¼ cup sour cream
INSTRUCTIONS
  1. Brown the ground beef in 3 quart saucepan. Drain and set aside.
  2. In the same saucepan add 1 T butter and add onion, shredded carrots, parsley flakes, basil and celery. Saute until tender.
  3. Add the broth, potatoes and beef and bring to a boil. Reduce heat, cover and simmer 10-12 minutes or until potatoes are tender.
  4. In small skillet melt remaining butter (3 T) and add the flour. Cook and stir for 3-5 minutes or until bubbly. Add to the soup and bring to a boil. Cook and stir for 2 minutes. Reduce heat to low.
  5. Stir in the cheese, milk, salt and pepper. Cook and stir until cheese melts. Remove from heat and blend in sour cream.
Author:
https://therecipecritic.com/cheeseburger-soup/
Recipe Adapted from Taste of Home

Sunday, January 19, 2025

Homemade Baked and Buttery Soft Pretzels

Do you love Auntie Anne's Pretzels? 


I have gotten rave reviews from this recipe.
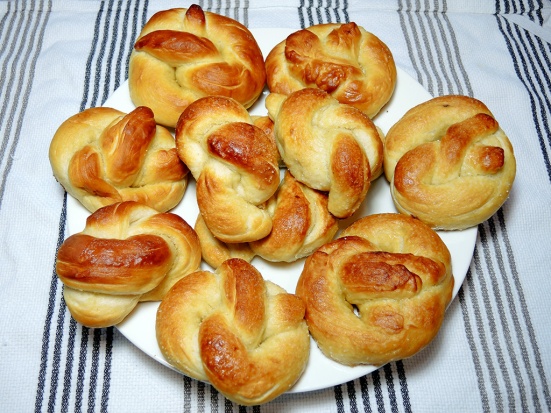
Doesn't it look delicious?   ~Shelly


Braided and baked soft pretzels.

Ingredients

3 cups of all purpose flour plus a little more for dusting 
1/4 cup of sugar 
2 teaspoons of salt
1.25 cups of warm water
1 teaspoon of sugar 
4 teaspoons of active, dry, baker’s yeast 
1 tablespoon and 1 teaspoon of melted butter or vegetable oil for the dough
2 tablespoons of melted butter for brushing after baking
4 cups of hot water
1/2 cup of baking soda
Pretzel, kosher, or coarse sea salt for salting the pretzels

Equipment

  • Small bowl
  • Large mixing bowl
  • 1 or 2 baking sheets
  • Aluminum foil
  • Large pot
  • Slotted spoon
  • Rubber spatula
  • Cup, tablespoon, and teaspoon measurements
  • Pastry / basting brush
  • Large flat surface
  • Knife

Directions

  1. Combine the 3 cups of flour, 2 teaspoons of salt, and 1/4 cup of sugar in a large mixing bowl. Mix the dry ingredients well using a fork. man-fuel-food-blog-homemade-soft-pretzels-recipe-dry-ingredients
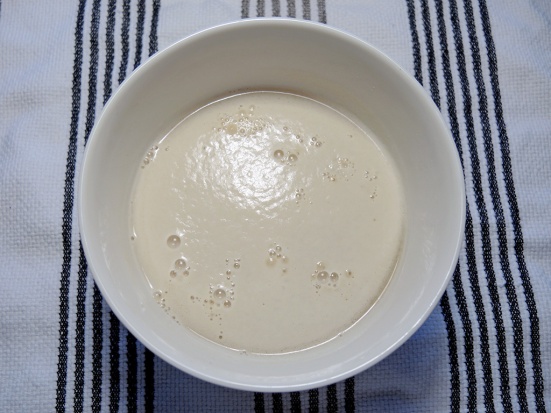
  2. In a small bowl, mix the 1.25 cups of warm water with a teaspoon of sugar and the 4 teaspoons of yeast. Mix well until dissolved and let the mixture sit for about 10 minutes until it gets a little frothy. It may even smell a little bit like beer, which is good because yeast is one of the ingredients that gives beer a lot of its distinctive flavor and aroma. man-fuel-food-blog-homemade-soft-pretzels-recipe-yeast
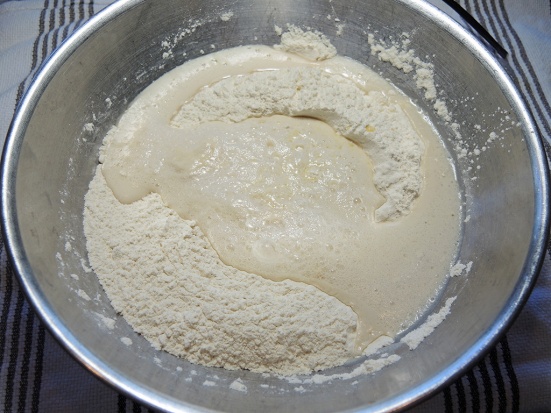
  3. After 10 minutes, melt a tablespoon of butter in the microwave (or use vegetable oil) and add it to the flour mixture along with the yeast liquid. man-fuel-food-blog-homemade-soft-pretzels-recipe-flour-and-yeast
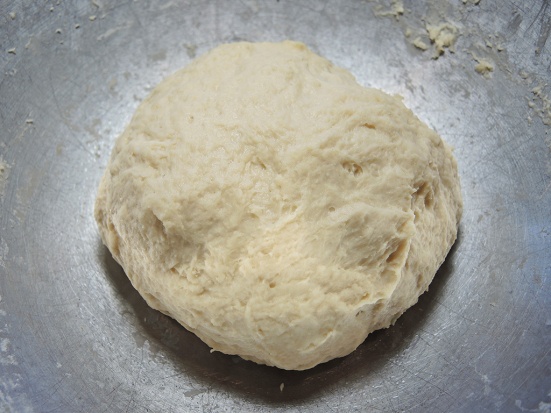
  4. Mix the ingredients well starting with a rubber spatula. When the dough starts to form into a uniform paste, you can use your hands to knead the dough for 6 to 8 minutes until all of the ingredients are well incorporated and you can shape the dough into a ball. Don’t overdo it with the kneading though. The idea is just to get everything well mixed. man-fuel-food-blog-soft-pretzels-recipe-dough-ball
  5. Next, use a teaspoon of vegetable oil to grease the outside of the entire dough ball to keep it from sticking to the bowl as it rises.
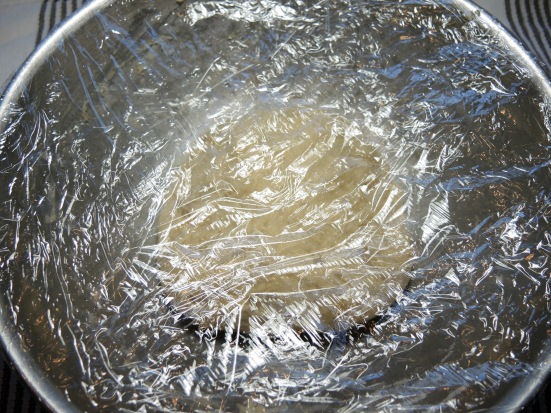
  6. Cover the dough with plastic wrap or a towel and let it rise for 1 hour at room temperature (don’t refrigerate!). man-fuel-food-blog-soft-pretzels-recipe-covered-dough
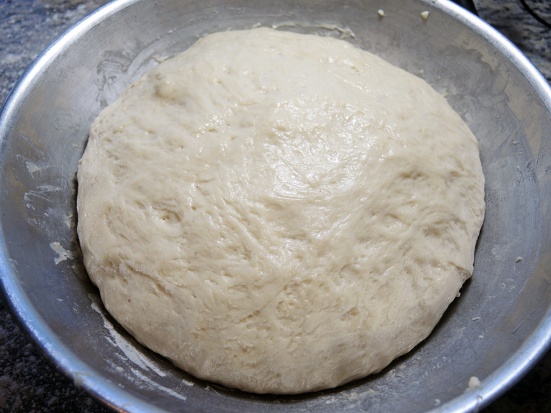
  7. After an hour, the dough will have risen noticeably and be very soft to the touch. You’ll also start to smell that wonderful yeast and dough combination that is a precursor to baked breads. man-fuel-food-blog-homemade-pretzels-recipe-risen-dough
  8. At this point, start to pre-heat your oven to 450 degrees F.
  9. Dust a flat, clean surface like a counter-top with some flour and carefully get the dough ball out of the bowl and onto the counter. Dust the top of the dough with a little more flour to help keep it from sticking. man-fuel-food-blog-homemade-soft-pretzels-recipe-risen-dough
  10. Dust your hands with flour and cut the dough in half. Start stretching and forming half the dough into an elongated rectangle that you can then cut into 6 equal pieces. When you have a nice stretched rectangle, cut the dough into six pieces and repeat this process for the other half of the dough. You should end up with 12, evenly sized pieces of dough. man-fuel-food-blog-homemade-soft-pretzels-recipe-dividing-dough
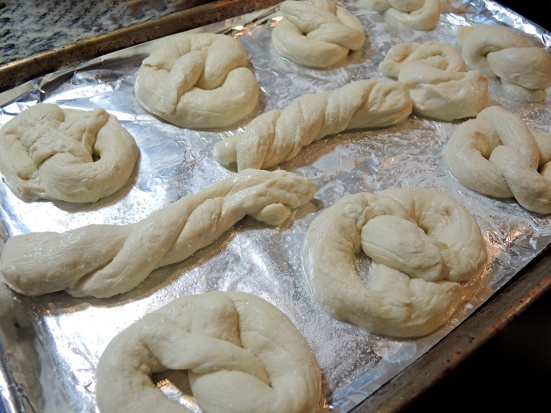
  11. Now it’s time to create some fun shapes! Roll out a piece of dough into a long, thin cord. The length is really up to you depending on what kind of shapes you want to make. The typical bowed pretzel shape is always fun and you’ll need a decently long cord for that. I found that the usual pretzel shape is great, but I also really liked just rolling out a cord of dough and tying it in a single knot (like the first knot in a square or granny knot for anyone that knows their knots). I don’t recommend the long twisty style you might see in my pictures. Those looked fun, but didn’t give the best results. man-fuel-food-blog-soft-pretzels-recipe-braiding-pretzels
  12. Repeat this process for all of the pieces of dough. Mix and match the shapes as you like! man-fuel-food-blog-soft-pretzels-recipe-braided-pretzels
  13. When done with the braiding, get 4 cups of hot water and 1/2 a cup of baking soda ready to use. If your hot tap water isn’t clean or isn’t hot enough just heat some cold water and let it cool slightly so that it is hot, but not boiling. Some light steam is ok. Then add in the baking soda and mix until well dissolved. This step is especially important because this alkaline mixture of baking soda and water is what will help to give the pretzels that deep brown color on the outside as well as that nice outer texture that is so characteristic of soft pretzels. It works because the alkaline mixture speeds up the browning process as the pretzels cook.  man-fuel-food-blog-soft-pretzels-recipe-baking-soda-and-water
  14. Line a baking sheet with aluminum foil (2 baking sheets if your pretzels won’t all fit on one sheet). Keep in mind that the pretzels will expand a bit as they bake. Also make sure to grease the foil very well using butter or vegetable oil. This will help to keep the pretzels from sticking when they bake.
  15. Using a slotted spatula or large slotted spoon, carefully scoop up a pretzel and place it into the hot baking soda mixture. Let it sit for 15 seconds or so as you splash some of the water over the top using the spatula or spoon. Then take it out of the water, let it drain a bit, and place it on the baking sheet. Repeat this process for all of the pretzels. man-fuel-food-blog-soft-pretzels-recipe-blanched-dough-in-baking-soda
  16. Sprinkle the pretzels with pretzel salt, kosher salt, or coarse sea salt. Don’t go overboard with the salt, but just make sure to lightly cover the tops.
  17. Slide the baking sheet(s) into the oven and make the pretzels for 10 minutes or until they are a nice deep brown. Not all areas of the pretzel will get that deep brown, so just pull them out as soon as the outermost edges are that classic pretzel color. man-fuel-food-blog-soft-pretzels-recipe
  18. Melt 2 tablespoons of butter in the microwave to brush butter onto the pretzels. man-fuel-food-blog-soft-pretzels-recipe-melted-butter
  19. Brush each pretzel with a nice amount of butter to coat the entire top. Then throw them in the oven for another 1 to 2 minutes. You’ll end up with some rich, buttery, glistening pretzels. man-fuel-food-blog-buttereing-homemade-soft-pretzels-recipe
  20. Serve them immediately or, better yet, let them cool. I discovered that the pretzel flavor actually depends as these pretzels cool. They taste great piping hot, but they taste even more like traditional pretzels when they cool down. man-fuel-food-blog-homemade-soft-pretzels-recipe
  21. Eat them with your favorite mustard for a savory treat or eat them like a dessert dipped in a sweet vanilla glaze! These pretzels work as a salty or sweet treat. They’re also just wonderful plain or buttered.
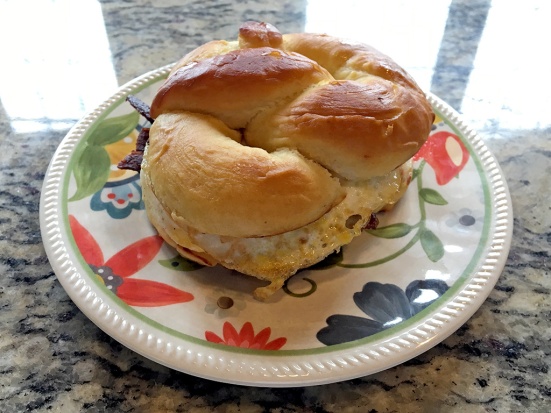
  22. If you have leftover pretzels, place them in a sealed plastic zipper bag and refrigerate. Use them the next morning to make pretzel breakfast sandwiches! man-fuel-food-blog-homemade-pretzels-recipe-pretzel-bun-breakfast-sandwich

BBQ Country Style Ribs


Country-style ribs come from the shoulder portion of the pig. This makes them fattier, easier to prepare and cook.

Serve with a classic Baked Beans recipe and a delicious Potato Salad for the perfect family gathering.


Ingredients


  • 4 lbs country style ribs
    1.5-2 cups BBQ sauce
Rib Rub

  • 1 tablespoon chili powder
  • 1 tablespoon dark brown sugar packed
  • 2 teaspoons smoked paprika
  • 1 teaspoon cumin
  • 1 teaspoon dried oregano
  • 1 teaspoon kosher salt
  • 1 teaspoon red pepper flakes crushed
  • 1/2 teaspoon black pepper

Instructions

  • Preheat oven to 250°F and place ribs on a rimmed baking sheet (I line with foil for easy cleanup).
  • In a small bowl whisk together rib rub ingredients.
  • Coat the ribs in the seasoning and cover tightly with foil. Cook for 1 1/2 to 2 hours or until the ribs just start to feel tender.
  • Remove from the oven and liberally baste the ribs with bbq sauce. Cook for another 45 mins to 1 hour uncovered until fork tender.
  • If desired, turn your oven onto the broil setting and let the BBQ sauce on the ribs bubble and lightly brown.


Creamy Garlic Chicken Breasts


Tried and True  ~Shelly

Chicken Breasts in an irresistible garlic sauce
filled with caramelized onions and garlic.

Ready in less than 30 minutes and perfect for any night of the week…even special occasions! 


HOW TO COOK CHICKEN BREAST

  • You’re going to start with thin chicken breasts. For a faster prep-time, cut your chicken breasts in half horizontally to make four fillets.  Quicker and easier than pounding them thin with a meat mallet and yields the same results. Thinner chicken pieces cook faster and evenly.
  • Use a combination of oil and butter to fry the chicken for the best golden browned results and delicious flavor.
  • Cook the sauce in the same pan as the chicken. Don’t get rid of any chicken bits from the pan as they add tons of flavor into the sauce!

COOKING WITH GARLIC

The beauty of this chicken breast recipe is that the garlic is NOT overpowering AT ALL! The secret to having SO much garlic without being overly pungent is caramelising the cloves (some smashed and some whole) in chicken stock (or broth) for 5-6 minutes over medium heat. This allows the garlic to soften beautifully with a hint of sweetness.

GARLIC FLAVOR

YOU can make this as garlicky as you want! How? For a stronger garlic flavor, smash all of your cloves with a heavy knife. Place the blade flat on the clove (sharp side facing away from you) and press the blade down on the clove with the heel of your hand. 

The garlic cloves are lightly browned in a little oil along with softened onion in buttery pan juices before being gently simmered in chicken stock. 

For a much milder sauce, add the garlic cloves whole.

TIPS

  • You can use heavy cream, whipping cream or thickened cream in the sauce.
  • For a lightened up sauce, use evaporated milk or half and half. If using half and half, be careful not to bring your sauce to a rapid boil or it may curdle.
  • The sauce will not thicken immediately after adding in your cream. Once you add your chicken breasts back into the pan, the flour from the chicken will thicken your sauce. No cornstarch needed.  

SIDES THAT GO WITH CREAMY GARLIC CHICKEN BREASTS
We love this chicken breast recipe with steamed rice or mashed potatoes.
You can also serve it over pasta, cauliflower mash or zucchini noodles.


Ingredients - Serves 4

For The Chicken:

  • 2-3 large boneless and skinless chicken breasts halved horizontally to make 4
  • 4 tablespoons flour (all purpose or plain)
  • 4 tablespoons finely grated fresh Parmesan cheese
  • 2 teaspoon salt
  • 1 teaspoon garlic powder
  • 1/2 teaspoon Black cracked pepper

For The Sauce:

  • 5 tablespoons olive oil
  • 2 tablespoons butter
  • 1 small onion finely chopped
  • 1 whole head of garlic peeled and divided into 10-12 cloves
  • 1 1/4 cup chicken broth (stock)
  • 1 1/4 cup half and half or heavy cream (or evaporated milk)
  • 1/2 cup finely grated fresh Parmesan cheese
  • 2 tablespoons fresh parsley, to serve

Instructions

  • Season the chicken with salt, garlic powder and pepper.
  • In a shallow bowl, combine the flour, Parmesan cheese. Dredge chicken in the flour mixture; shake off excess.
  • Heat 2 tablespoons of oil and 1 tablespoon butter in a large skillet over medium-high heat. Swirl pan to coat evenly. 
  • Fry 2-3 chicken breasts until golden on each side, cooked through and no longer pink (about 4-5 minutes each side, depending on the thickness of your chicken). Transfer to a warm plate. Set aside.
  • Wipe pan over with a sheet of paper towel. Repeat with remaining oil, butter and chicken breasts. When cooked, transfer the chicken onto the same plate.
  • Reduce heat to medium. Sauté the onion in the remaining oil/juices in the pan until softened. 
  • Smash 6 whole cloves of garlic with the blunt edge of the back of a knife 
  • Add the remaining oil to the pan and heat through, mixing it through the onions. Sauté smashed garlic cloves and whole garlic cloves until fragrant, about 2-3 minutes. Add the broth to deglaze the pan. Scrape up any browned bits and let simmer and reduce to half, about 5 minutes.
  • Reduce heat to medium-low. Pour in the cream. Bring the sauce to a gentle simmer for about 2-3 minutes, combining all of the flavours together.
  • Mix in the Parmesan cheese. Continue cooking gently for about 2-3 minutes until cheese melts, while stirring occasionally. Season with salt and pepper to your taste. 
  • Add the chicken back into the pan and let simmer for a further 2-3 minutes to thicken the sauce to your liking. The chicken breast will soak up all of the delicious flavors.
  • Garnish with parsley and a little black cracked pepper. 
    Serve over pasta, cauliflower mash, zucchini noodles, rice or mashed potatoes.

Nutrition

Calories: 458kcal | Carbohydrates: 11g | Protein: 21g | Fat: 36g | Saturated Fat: 13g | Cholesterol: 85mg | Sodium: 1205mg | Potassium: 403mg | Sugar: 1g | Vitamin A: 710IU | Vitamin C: 10.3mg | Calcium: 285mg | Iron: 1mg


From Karina at: Cafe Delites

Apple Danish


Ingredients

3 Cups All Purpose Flour
1/2 Teaspoon salt
1 cup shortening
1 large egg yolk
1/2 cup milk

Filling
6 cups sliced, peeled apples
1 1/2 cup sugar
1/4 cup butter, melted
2 Tablespoons flour
1 teaspoon ground cinnamon

Glaze
1 large egg white, slightly beaten
1/2 cup confectioners' sugar
2-3 teaspoons water

Directions
1. In a bowl combine flour and salt, cut in shortening until mixture resembles course crumbs.  Combine egg yolk and milk, add to flour mixture.  Stir just until dough clings together.  Divide dough in half.

2. On a lightly floured surface, roll half of dough into a 15 x 10 inch rectangle; transfer to a greased 15 x 10 x 1 inch baking pan.  Set aside.

3. In a bowl, toss together filling ingredients, spoon over pastry in pan.  Roll our remaining dough into another 15 x 10 in rectangle.  Place over filling/  Brush with egg white.  Bake at 375 degrees for 40 minutes or until golden brown.  Cool on a wire rack.

4. For glaze, combine the confectioners' sugar and enough water to achieve a drizzling consistency.
Drizzle over warm pastry.  Cut into squares,  Serve warm or cold.


Sunday, January 12, 2025

Grilled Ribeye Steak with Cabernet Mushrooms


This recipe for Grilled Ribeye Steak with Cabernet Mushrooms is the last of the incredible grilled steak recipes Chef Brandon Douglas taught participants at the “Sizzling Summer Steaks” event that was part of the “Made from Scratch” cooking classes in 2013 at the Winrock Institute on Petit Jean Mt.


Chef Douglas says the ribeye is his favorite steak cut because of the wonderful marbling of fat this cut features compared to leaner cuts of beef steak. He says the fat adds to the sweet, rich flavor of this recipe. He combined sliced baked sweet potato wedges when he plated the finished steak and mushroom sauce.


Ingredients
  • 1 cup dry cabernet sauvignon
  • 2/3 cup green onion sliced in rounds
  • 1/4 cup extra-virgin olive oil, plus 2 tablespoons for garnish
  • 3 teaspoons fresh rosemary leaves, chopped; plus sprigs for garnish
  • 2 garlic cloves, crushed
  • 1 teaspoon salt
  • 1/4 cup balsamic vinegar
  • 1/2 cup demi glaze or Beef stock
  • 1/2 cup sugar
  • 1/2 teaspoon freshly ground black pepper
  • 4 Harter House Ribeye Steaks, 1-1/2 inches thick
  • your favorite mushrooms, rough chopped or whole
  • Baked Sweet Potato (Optional)
Directions
  1. Make small cuts with knife into fat around the edge of steaks. Rub with your favorite seasoned salt steak rub and pepper. Refrigerate for 30 minutes to an hour.
  2. Clean grill grate and preheat grill to high heat.
  3. Place steaks on hot grill for three minutes on each side to sear. Reduce grill temperature to low and close the lid. Continue cooking steaks an additional five to 10 minutes for medium-rare, turning halfway through. Let steaks rest for five minutes before serving.
    OPTION - cook till Medium Rare on the grill.
  4. As steaks cook, add olive oil to saute’ pan. Add mushrooms, garlic and saute’ until mushrooms become tender. Excluding green onions, add remaining ingredients and reduce until sauce forms. Adjust seasoning with salt and pepper.
  5. Pour on top of finished steak. Garnish with green onions and remaining olive oil. Serve with baked sweet potato.


Pecan Pie Bars

Pecan Pie Bars with a shortbread style crust, a sweet, creamy filling and crisp, toasted pecans on top; they're like pecan pie only without all the work!


Pecan Pie Bars
Slightly adapted from The Girl Who Ate Everything

Crust Ingredients:
2 cups all purpose flour
1/4 cup granulated sugar
1/2 teaspoon salt
3/4 cup cold, unsalted butter - 12 tablespoons

Filling:
3 large eggs
1/2 cup packed brown sugar
1/2 cup granulated sugar
1 cup light corn syrup
2 tablespoons melted butter
1 teaspoon vanilla extract
1 3/4 cups chopped pecans

1. Preheat the oven to 350 degrees F. Grease or spray a 9x13 inch baking pan with cooking spray. 

2. In a bowl mix the flour, sugar, and salt. Cut in the cold butter until the mixture is fine particles. Or you can mix this in a food processor and pulse until you have fine crumbs. Pour crust mixture into the prepared baking pan. Spread out evenly and press crust down firmly all over.

3. Place crust in oven and bake for about 20 minutes until just lightly golden around edges.

4.While crust is baking prepare the topping. Mix eggs, sugars, corn syrup, melted butter and vanilla together in a bowl until smooth. Stir in the chopped pecans. Spread the topping over the crust as soon as it comes out of oven.

5. Place bars in the oven and bake for 25-30 minutes until the topping is set. If the topping jiggles, it is not done. If the topping begins to brown to much, loosely place a sheet of foil over the pan.

6. Allow Pecan Pie Bars to cool completely before cutting. Enjoy!

From Lyndasrecipebox.com


Sunday, January 5, 2025

Garlic Butter Baked Pork Chops with 2 sides


Garlic Butter Baked Pork chops are juicy, tender, and super flavorful thanks to the amazing butter sauce.

INGREDIENTS
2 medium sized Pork Chops
kosher salt and freshly ground pepper
4 Tablespoons butter - melted
1 Tablespoon fresh thyme - chopped
2 cloves garlic - minced
1 Tablespoon extra virgin olive oil

INSTRUCTIONS

  1. Preheat oven to 375 F.
  2. Season the pork chops with salt and pepper, and set aside.
  3. In a small bowl, mix together the butter, thyme, and garlic.  Set aside.
  4. In a cast iron skillet, heat olive oil over medium heat.
  5. When the skillet is really hot, add the pork chops.  Sear until golden, about 2 minutes per side.
  6. Pour garlic butter mixture over the pork chops.
  7. Place the skillet in the oven, and cook until the pork chops reach an internal temperature of 145 F, about 10-12 minutes.  The time depends on the thickness of the pork chops.*
  8. Remove from the oven.  Using a spoon, pour some of the butter sauce left in the skillet onto the pork chops before serving.

*  Insert the thermometer into the thickest part of the pork chop.


CRISPY ROASTED GREEN BEANS

INGREDIENTS
2 pounds green beans - trimmed
4 teaspoons extra virgin olive oil
1 teaspoon Italian seasoning
1/2 teaspoon garlic powder
1/2 teaspoon crushed red pepper
salt and fresh ground pepper

INSTRUCTIONS

  1. Preheat oven to 425 F
  2. Place a baking sheet in the oven for 10 minutes
  3. In a medium bowl, place the green beans and all the remaining ingredients.
  4. Mix well.
  5. Arrange the seasoned green beans in a single layer on the preheated baking sheet.
  6. Bake for about 8 minutes or until crisp tender.


ROASTED BUTTERNUT SQUASH MASH

INGREDIENTS
1 butternut squash
2 Tablespoons extra virgin olive oil
3 gloves garlic - minced
4 Tablespoons butter
Salt and black pepper
cayenne pepper for garnish

INSTRUCTIONS

  1. Preheat oven to 400 F
  2. Line a baking sheet with parchment paper or aluminum foil.  Set aside
  3. Wash and cut the butternut squash in half lengthwise.  Using a spoon, scoop out the seeds.
  4. Place both halves face up on the prepared baking sheet.
  5. Drizzle with olive oil and season with salt, pepper, and garlic.
  6. Roast in the oven for 45 - 60 minutes until fork tender.
  7. Remove the squash from the oven, and let cool for about 5 minutes.
  8. Using a large spoon, remove all of the squash flesh from the skin, and place it into a bowl for mashing.
  9. Add the butter, sea salt and pepper, and mash well until fluffy and smooth.  I like to use a hand mixer.
  10. Sprinkle with cayenne pepper and butter for extra flavor before serving.


Chicken Parmesan Casserole


This chicken Parmesan is done casserole style (so, no breading or frying!), but still offers up that irresistible combination of tender chicken, crunchy/cheesy coating, and flavorful sauce."     

Ingredients

2 tablespoons olive oil
2 cloves garlic, crushed and finely chopped
1/4 teaspoon crushed red pepper flakes, or to taste
4 skinless, boneless chicken breast halves (not too large)
2 cups prepared marinara sauce
1/4 cup chopped fresh basil                                    
1 (8 ounce) package shredded mozzarella cheese, divided
1/2 cup grated Parmesan cheese, divided
1 (5 ounce) package garlic croutons
                                                             

Directions

  1. Preheat oven to 350 degrees F (175 degrees C).
  2. Coat the bottom of a 9x13 inch casserole dish with olive oil, and sprinkle with garlic and hot red pepper flakes.
  3. Arrange the chicken breasts in bottom of the dish, and pour marinara sauce over chicken. Sprinkle basil over marinara sauce, and top with half the mozzarella cheese, followed by half the Parmesan cheese. Sprinkle on the croutons, then top with the remaining mozzarella cheese and remaining Parmesan cheese.
  4. Bake in preheated oven until cheese and croutons are golden brown and the chicken is no longer pink inside, about 35 minutes to an hour, depending on the shape and thickness of your chicken breasts. An instant-read thermometer inserted into the thickest part of a chicken breast should read at least 160 degrees F (70 degrees C).  


Pork Schnitzel with Garlic Sauce


INGREDIENTS

4 Harter House Pork Cutlets
1 1/2 cups all purpose flour
kosher salt and fresh ground black pepper
2 large eggs
1/2 cup milk
4 cups plain dried bread crumbs or Panko.
2 tablespoons extra virgin olive oil
2 tablespoons butter
1 sprig thyme
lemon wedges


Put the flour in a shallow dish and season with salt and pepper.  Whisk the eggs and milk in another shallow dish and season with salt and pepper.  Put the bread crumbs in a third dish and again season with salt and pepper.

Lightly dredge each piece of pork in flour, then egg, and finally the bread crumbs, pressing the bread crumbs onto the pork gently so they have a nice even coating.

Lay the breaded pork cutlets in a single layer on a plate lined with parchment and refrigerate uncovered, for 10 - 12 minutes to allow the coating to dry out a little and adhere to the pork.

Heat oil and butter in a nonstick skillet over medium high heat.  Add the thyme sprig and let it fry for about 1 minute to infuse the oil.  Remove the thyme sprig and reserve.  Gently lay the cutlets into the pan and cook until golden brown and crispy, about 3 minutes per side.  

Remove to paper towels to drain.  Season with salt and transfer to a serving platter while still hot.  Garnish with lemon wedges and the fried sprig of thyme before serving.


GARLIC SAUCE for 4 cutlets

4 Tablespoons butter
2 clove garlic
2 Lemon, juiced
Fresh Parsley or thyme

Add butter and whole garlic and heat to infuse butter.
Squeeze lemon and add parsley / thyme to the pan.  Mix well and pour over schnitzel.


PORK SCHNITZEL SANDWICH

There is not much better than this Pork sandwich.
Add your favorite sauce. provolone cheese, lettuce, tomato, and  onion, on a toasted bun.


Pumpkin Cookies


INGREDIENTS

1 cup butter, room temperature
1/2 cup granulated sugar
1/2 cup light brown sugar
1 egg
2 teaspoons vanilla
1 1/2 cups pumpkin puree
3 1/2 teaspoon pumpkin pie spice
1/2 teaspoon kosher salt
1 teaspoon baking powder
1 teaspoon baking soda
2 cups all purpose flour
1 (12 oz.) bag white chocolate chips

ICING
1/2 cup light brown sugar
3 Tablespoons butter
1/4 cup milk
2 cups sifted powder sugar

INSTRUCTIONS COOKIES

1. Preheat oven to 350 F.  Line a baking sheet with parchment paper and set aside
2. In the bowl of your stand mixer fitted with the paddle attachment, mix the butter, granulated sugar, and brown sugar on medium speed fpr 2 minutes.
3. Add in the egg, vanilla, pumpkin, pumpkin pie spice, salt, baking powder, baking soda, and mix for 1 minute till smooth, scraping the sides of bowl as necessary,
4. Turn the mixer to low and add in the flour, mixing until just combined.  Stir in the white chocolate chips until evenly incorporated.
5. Using a medium (2 Tablespoon) size cookie scoop, drop the dough onto the prepared baking sheet.  Bake for 10 - 12 minutes until the edges are slightly golden.  Allow them to cool on the baking sheet for 2 minutes and then transfer to a wire rack to cool completely.

6. ICING: In a medium sauce pan stir together the brown sugar and butter over medium heat.
7. Bring the mixture to a bowl and continue cooking for 1 minute.  Whisk the milk and powdered sugar until smooth.  Alternately you can use a hand mixer for this step.
8. Spread about 1 teaspoon on the top of each cookie and allow to set.

NOTW:  Store airtight at room temperature for up to 3 days.

Source