Monday, August 27, 2018

Crunchy Thai Peanut & Quinoa Salad


This Thai-flavored salad recipe is made with carrots, cabbage, snow peas, and quinoa, tossed in delicious peanut sauce. This healthy salad is vegan, gluten free, and packs well for lunch. Recipe yields 4 salads.

Ingredients
Salad
  • ¾ cup uncooked quinoa
  • 1 ½ cups water
  • 2 cups shredded purple cabbage
  • 1 cup grated carrot
  • 1 cup thinly sliced snow peas or sugar snap peas
  • ½ cup chopped cilantro
  • ¼ cup thinly sliced green onion
  • ¼ cup chopped roasted and salted peanuts, for garnish
Peanut sauce
  • ¼ cup smooth peanut butter
  • 3 tablespoons reduced-sodium tamari or soy sauce
  • 1 tablespoon maple syrup or honey
  • 1 tablespoon rice vinegar
  • 1 teaspoon toasted sesame oil
  • 1 teaspoon grated fresh ginger (I love ginger so I used 2 teaspoons)
  • ½ lime, juiced (about 1 ½ tablespoons)
  • Pinch of red pepper flakes

Instructions

  1. Cook the quinoa: First, rinse the quinoa in a fine mesh colander under running water. In a medium-sized pot, combine the rinsed quinoa and 1 ½ cups water. Bring the mixture to a gentle boil over medium heat, then reduce the heat to medium-low and gently simmer the quinoa until it has absorbed all of the water. Remove the quinoa from heat, cover the pot and let it rest for 5 minutes. Uncover the pot and fluff the quinoa with a fork. Set it aside to cool.
  2. Meanwhile, make the peanut sauce: Whisk together the peanut butter and tamari until smooth (if this is difficult, microwave the mixture for up to 30 seconds to loosen it up). Add the remaining ingredients and whisk until smooth. If the mixture seems too thick to toss into the salad, whisk in a bit of water to loosen it up (I didn’t need to do this).
  3. In a large serving bowl, combine the cooked quinoa, shredded cabbage, carrot, snow peas, cilantro and green onion. Toss to combine, then pour in the peanut sauce. Toss again until everything it lightly coated in sauce. Taste, and if it doesn’t taste quite amazing yet, add a pinch of salt and toss again. Divide into individual bowls and garnish with peanuts.
  4. This salad keeps well, covered and refrigerated, for about 4 days. If you don’t want your chopped peanuts to get soggy, store them separately from the rest and garnish just before serving.

Notes

Recipe minimally adapted from Frugal Vegan by Katie Koteen and Kate Kasbee. 

Tuesday, July 31, 2018

Almond Crusted Stuffed Chicken Breast


I am always looking for new ways to eat chicken.

I recently prepared this recipe on a KOLR-10, Ozarks Live segment.  Perhaps you saw it.
The recipe is really easy to make. 


Ingredients
2 chicken breasts thinned to about 1/4 inch thick (I put each chicken piece in between two pieces of saran wrap and pounded them with my mallet)
1 onion (yellow or white), chopped
1 cup chopped spinach
2 cloves garlic
4 pieces of cooked bacon, crumbled into smaller pieces
Olive Oil
Salt and Pepper
coarsely ground almonds (I used my Magic Bullet.)
Toothpicks (to hold the chicken together!)

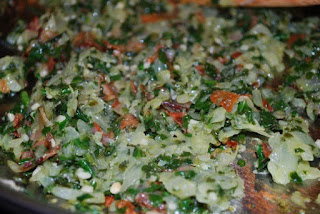
Heat a couple tablespoons of olive oil in a saucepan and sauté onions and garlic for about 5 minutes.  Add spinach and bacon pieces, cook a few minutes more until it looks something like this…

Take your thinned out chicken breasts and place them on a cookie sheet. Divide the spinach onion mix and spread onto the chicken. Like this…Except my chicken breast was more flat this this picture.

Roll chicken up and secure with a couple toothpicks. Brush with a little olive oil and sprinkle with salt and pepper. Have  your coarsely ground almonds (I put my whole almonds in the food processor and gave it a couple grinds until they were in small little chunky pieces). Roll your chicken into the almonds and place on a baking sheet. Bake at 350 for 30 – 35 minutes.  When it comes out of the oven it will look something like this…


ENJOY


Tuesday, July 24, 2018

Chicken Parmigiana


This is definitely one of my favorite recipes.
I know you will love it also.  ~Shelly

Tender pieces of crumbed chicken are topped with homemade tomato sauce and grated cheese, and then oven baked until the cheese is golden and melted. The tomato sauce and crumbed, uncooked chicken can be prepared in advance but it is best to cook the chicken and assemble the dish just before it goes into the oven.Serves 4


Tomato Sauce
Makes about 1 1/3 cups.

1 tablespoon oil
1/2 medium onion, peeled and finely chopped
2 large garlic cloves, peeled and crushed
1 can crushed/diced tomatoes
1/2 teaspoon dried basil
1 1/2 teaspoons brown sugar, firmly packed
Salt and pepper


Chicken
4 skinless chicken breast fillets or tenderloins
2 eggs
1 tablespoon milk
1/3 cup plain flour
About 1 cup pamko breadcrumbs
1/2 cup grated parmesan
About 1/2 cup oil, for frying

Cheese Topping1 1/3 cups, Fresh Mozzarella OR grated mozzarella cheese
1/2 cup, lightly packed grated tasty provolone cheese
1/4 cup grated parmesan cheese
Fresh Basil


Heat oil in a heavy-based medium saucepan over medium heat. Add onion and garlic and cook, stirring occasionally, for about 5 minutes, until onion has softened but not browned. Add tomatoes, basil and brown sugar, increase heat and bring to the boil. Once boiling, reduce heat and simmer for about 35-40 minutes, stirring occasionally, until sauce has reached the desired consistency. Add salt and pepper to taste. Set aside for 10 minutes, and then puree sauce in a blender or food processor.

Trim any fat from chicken. If using chicken breasts, cut them in half horizontally. Cover chicken with a freezer bag and lightly pound with the flat side of meat mallet to flatten.
© exclusivelyfood.com.auWhisk eggs and milk together in a bowl. Coat one piece of chicken in flour and shake to remove excess. Then dip the chicken into the egg and milk mixture ensuring that all of the flour is moistened.

Then coat the chicken in pamko breadcrumbs, pressing firmly to ensure crumbs adhere. Repeat with remaining pieces of chicken.


To fry chicken, heat some of the oil in a heavy-based frying pan over medium-high heat. We cook the chicken in two batches using 1/4 cup of oil for each batch (the number of batches will be determined by the size of your frying pan and you'll need to divide the oil evenly between each batch). Fry the chicken in a single layer, without overcrowding the pan, until golden brown.  They will not yet be cooked through.


Wipe the pan out with paper towels between each batch of chicken to remove any crumbs. This prevents the overcooked loose crumbs adhering to the next batch of chicken.

Drain cooked chicken on paper towels.

Place cooked chicken in a large baking dish and spread with sauce. Sprinkle with combined cheeses and basil.


Bake at 200 degrees Celsius (180 degrees fan-forced) for about 15-20 minutes, or until cheese is melted and golden. We sprinkle the chicken parmigiana with chopped parsley before serving.


recipe adapted from
www.exclusivelyfood.com.au


Monday, July 2, 2018

What's the Difference Between Baby Back Ribs and Spareribs?


Pork ribs are always a treat, whether cooked indoors or outdoors, but what kinds of ribs should you buy? Let's take a look at the two most commonly sold types of ribs: baby back ribs and St. Louis-style spareribs.
Baby back ribs
(Image credit: Christine Gallary)

Baby Back Ribs

Other names: pork loin back ribs, back ribs, or loin ribs
Back ribs are cut from where the rib meets the spine after the loin is removed. The upper ribs are called baby back ribs, but not because they come from a baby pig! They're only called baby because they are shorter in relation to the bigger spareribs.
(Image credit: Christine Gallary)
Each baby back rib rack averages 10 to 13 curved ribs that are 3 to 6 inches long and weigh about 1 1/2 to 2 pounds, which feeds about 2 people.
Baby back ribs are very tender and lean but are in higher demand than St. Louis-style spareribs, so they have a higher price tag.
St. Louis-Style Spareribs
(Image credit: Christine Gallary)

St. Louis-Style Spareribs

Other names: breastbone-off pork spareribs
Spareribs are the meaty ribs cut from the belly of the animal after the belly is removed. They are usually trimmed down into the popular St. Louis-style spareribs by cutting away the hard breastbone and chewy cartilage, so the slab is more rectangular in shape.
(Image credit: Christine Gallary)
St. Louis-style spareribs are flatter than baby back ribs, which makes them easier to brown. There is a lot of bone but also a higher amount of fat, making them very flavorful if cooked properly. Each slab usually weighs 2 1/2 pounds or more and feeds about three to four people, although the meatier, the better. St. Louis-style spareribs are cheaper than baby backs ribs.

Cooking Pork Ribs

Both baby back ribs and St. Louis-style spareribs require low, slow cooking time to become nice and tender. They are great for smoking, braising, grilling, or can be cooked in the oven. The ribs also take well to spice rubs and sauces.
Underside of the ribs
(Image credit: Christine Gallary)

Can You Substitute One Type of Rib for the Other?

Baby back ribs can be substituted for St. Louis-style spareribs, but since they are smaller, you will need about 1 1/2 times the amount of baby backs as St. Louis-style ribs.
The larger size of the St. Louis-style ribs means that they take longer to cook, so note that baby back ribs take about 1 1/2 to 2 hours to cook at 300°F, but St. Louis ribs will take 2 1/2 to 3 hours.
(Image credit: Emma Christensen)

How To Cook Ribs in the Oven

 www.thekitchn.com
Serves 6 to 8


What You Need

Ingredients

4 to 5 pounds pork spareribs or baby back ribs
1/4 cup Dijon mustard
2 teaspoons liquid smoke (optional)
1 cup spice rub, like this one
1 cup barbecue sauce, store-bought or homemade
Equipment
Baking sheet
Aluminum foil
Wire cooling rack
Pastry brush
Knife

 Instructions

Prepare the baking sheet: Line a baking sheet with aluminum foil and set a cooling rack on top. Lay the ribs on top of the rack in a single layer. This arrangement allows for heat circulation on all sides of the ribs.

Season the ribs: Mix the mustard and the liquid smoke, if using, and brush the ribs on both sides. Sprinkle the ribs with the dry rub and pat gently to make sure the rub adheres to the rib meat. Note: This step can be done the day ahead for a deeper flavor. Wrap the seasoned ribs in plastic wrap and refrigerate.


Broil the ribs: Heat the broiler and place an oven rack a few inches below the heating element. Make sure the meaty side of the ribs is facing up. Broil the ribs for about 5 minutes, until the sugar in the dry rub is bubbling and the ribs are evenly browned.

Bake the ribs: Set the oven to 300°F. Move the ribs to an oven rack in the middle of the oven. Roast for 2 1/2 to 3 hours for spare ribs or 1 1/2 to 2 hours for baby back ribs. Halfway through cooking, cover the ribs with aluminum foil to protect them from drying out.

Brush with barbecue sauce: About 30 minutes before the end of cooking, brush the ribs with barbecue sauce, re-cover with foil, and finish cooking.


Rest the ribs and serve: The ribs are done when a knife slides easily into the thickest part of the rib meat. Let them rest, covered, for about 10 minutes, and then cut between the bones to separate the individual ribs. Serve immediately with extra barbecue sauce for dipping.    


Monday, June 4, 2018

Pasta With Fresh Tomato Sauce and Ricotta

This wonderful pasta is made with nothing more than fresh tomato sauce and good ricotta, plus a little pecorino. It’s most delicious if you keep the pasta quite al dente; use just enough sauce, no more; give it a good pinch of crushed red pepper; and season it with enough salt of course. For the best results, use good quality imported noodles made from hard Durum wheat.


4 - 6 servings

Ingredients

1 pound dried pasta, such as farfalle or penne
Salt and pepper
2 tablespoons butter, softened
Crushed red pepper (optional)
2 ½ cups Quick Fresh Tomato Sauce, warm  (*see recipe)
6 ounces ultra-fresh ricotta, at room temperature
Grated pecorino
Basil leaves, for garnish


Preparation
  1. Cook the pasta in a large pot of well-salted water, making sure to keep it quite al dente.
  2. Put butter in a wide deep skillet over medium heat. Add drained pasta to the pan and season with salt, pepper and crushed red pepper, if using.
  3. Add tomato sauce gradually and stir to coat pasta, using only enough sauce for a light coating (you may not need the entire 2 1/2 cups).
  4. Transfer pasta to a warm serving bowl and dot top with spoonfuls of ricotta. Sprinkle lightly with pecorino and garnish with a few torn basil leaves.
Recipe by David Tanis

Check out this website https://cooking.nytimes.com/recipe


Shrimp and Pineapple Skewers with Peanut Sauce

Do you love a peanut sauce? 
This recipe called out to me and I want to give it a try.  ~Shelly


Ingredients
½ cup smooth peanut butter, preferably natural
3 tablespoons unsweetened coconut milk
1 ½ tablespoons lime juice, more as needed
2 teaspoons brown sugar
2 teaspoons soy sauce
2 teaspoons grated ginger root
1 garlic clove, minced
½ teaspoon sriracha or other hot sauce
¼ teaspoon plus a pinch kosher salt, more as needed
1 ½ tablespoons peanut oil
⅛ teaspoon crushed red chile flakes
1 pound cleaned large shrimp
2 cups pineapple chunks
Whole cilantro leaves and torn basil leaves, for garnish
 
Preparation
1.            In a food processor or blender, combine peanut butter, coconut milk, 3 tablespoons hot water, lime juice, sugar, soy sauce, ginger, garlic, sriracha and a pinch of salt. Purée until smooth. Add more lime juice and or salt to taste. Scrape into a bowl.
2.            Heat oven to 500 degrees. In a small bowl, whisk together peanut oil, remaining 1/4 teaspoon salt and chile flakes. Thread shrimp on skewers; brush all over with half the peanut oil mixture. Thread pineapple on separate skewers; brush with remaining oil mixture. Arrange shrimp and pineapple skewers on a large rimmed baking sheet.
3.            Roast skewers, turning them halfway through, until shrimp is opaque, about 5 minutes, and pineapple is lightly caramelized, about 10 minutes (use an oven mitt to remove shrimp skewers as they finish cooking but leave the pineapple in for longer). Sprinkle skewers with herbs and serve hot, with peanut sauce for dipping.