Friday, May 31, 2024

Caprese Salad & Robert Mondavi Wine


I don't know what reminded me of this, but tonight I have to have a Caprese salad.
We're also having a Porterhouse Steak from Harter House and baked potatoes with fresh chives and sour cream.  And of course a bottle of wine! 

My wine tonight is Robert Mondavi.  
California Wine - Cabernet Sauvingnon has velvety layers of blackberry, plum and cassis highlight our Cabernet Sauvignon. The wine has the sweet black cherry and dark berry fruit character that distinguishes California’s finest Cabernet Sauvignons, and its ripe fruit is supported by velvety tannins.

Around the dinner table or out on my patio, it's a wine I am going to share with my favorite people.


Caprese Salad

Ingredients:
1/2 pound fresh mozzarella cheese sliced 1/4-inch thick
2 large vine-ripened tomatoes, sliced 1/4-inch thick
1 cup fresh basil leaves
Coarse salt to taste
Freshly-ground black pepper to taste
2 tablespoons drained capers (optional)
1/4 cup extra-virgin Olive Oil


Preparation:
In a circular design around the side of a serving plate, alternate fresh mozzarella slices on a large platter (or on individual plates if you are doing individual portions) with sliced tomatoes, overlapping for effect.
Tear fresh basil leaves and sprinkle liberally over the slices. Add salt and freshly ground pepper to taste. Sprinkle capers over the top.
Just before serving, drizzle on some top-quality extra-virgin olive oil.

 
Makes 4 servings.

Asian Braised Pork shoulder


This recipe comes from Marina at Circle B Ranch.


Ingredients
Extra-virgin olive oil
One 3-pound pork shoulder
Kosher salt
5 cloves garlic, smashed and finely chopped
One 2-inch piece ginger, peeled and grated
1/2 cup soy sauce
1/2 cup rice wine vinegar
3 to 4 cups chicken stock
1/2 cup hoisin sauce
1/2 cup brown sugar
1/4 cup sambal oelek (Chili Paste - Can substitute Siracha)
1/4 tsp 5 spice
Zest and juice of 1 orange, zest removed in wide strips with a peeler

Instructions
  1. Preheat the oven to 300 degrees F.
  2. Coat a large wide ovenproof pan or Dutch oven with olive oil and bring the pan to high heat. Sprinkle the pork with salt and brown it on all sides. Remove from the pan and reserve.
  3. Ditch the fat from the pan and add a few drops of fresh oil. Toss in the garlic and ginger and cook for 1 to 2 minutes. Add the soy sauce and rice vinegar and reduce by half. Add the 3 cups chicken stock, hoisin sauce, brown sugar, sambal, 5 spice, orange zest and juice. Stir to combine, bring to a boil and reduce to a simmer. Taste to make sure it is delicious and adjust the seasoning if needed.
  4. Return the pork to the pan, cover and put in the oven. Braise the pork for 2 hours, turning it over once. If the liquid reduces too much during the cooking process, add the remaining 1 cup chicken stock. Remove the lid for the last 30 minutes of cooking.
  5. When the pork is VERY tender, remove the pan from the oven. Remove the pork, place the pan over medium heat, bring the liquid to a simmer and cook until the liquid reduces to a sticky sauce consistency.
  6. Serve the pork draped with the sauce. Also serve the pork shoulder with Pickled cucumber and daikon salad.


Pickled cucumber and daikon (radish) salad.

Ingredients

2 carrots, julienned
1 hothouse cucumber, sliced thinly, preferably on a mandoline
1 medium daikon radish, peeled, sliced in half lengthwise and sliced into thin half-moons, preferably on a mandoline
3/4 cup rice wine vinegar
1/4 cup fish sauce
2 tablespoons brown sugar
1 tablespoon sambal oelek (Chili Paste - Can substitute Siracha)
1 teaspoon grated ginger

Directions

In a large bowl combine the carrots, cucumbers and daikon. 
In a small jar or container with a lid, combine the rice wine vinegar, fish sauce, sugar, sambal, ginger and garlic. Shake well and let sit for at least 15 minutes to allow the sugar to dissolve and the flavors to marry. 
Toss the cucumber-daikon mixture with the vinaigrette and let sit outside the fridge for an hour before serving. Sprinkle with the scallions. 

Peach Kuchen

This recipe comes from Mary Brown, one of my very favorite customers.
It was delicious!  ~Shelly


Sassy Cinnamon enhances the custard-like topper.

1  2-layer size white cake mix
1/2 cup flaked coconut, toasted
1/2 cup butter
1  1-pound 13-ounce can sliced peaches, drained (3 cups)
5 tablespoons sugar
1 1/4 teaspoons cinnamon
2 cups sour cream
2 slightly beaten eggs

Combine cake mix and coconut.
Cut in softened butter till mixture resembles coarse crumbs.
Lightly press into bottom and 1/2 inch up sides of a 13 x 9 baking pan.
Bake at 350 degrees for 10 - 15  minutes.  
Arrange peach slices over crust.
Blend sour cream and egg; pour over all.
Bake at 350 degrees, just till sour cream is set.  About 10 minutes.

Makes 10-12 servings.


Sunday, May 26, 2024

Butter Pecan Chocolate Chip Cookies


I had these cookies at a party and they were mouth watering, to be sure.


INGREDIENTS

1 Cup unsalted butter
2 Cups all purpose flour
1 tsp baking soda
1 tsp salt
1/2 tsp cinnamon
1 Cup dark brown sugar0, packed
1/2 Cup granulated sugar
1tbsp molasses
2 large eggs
2 tsp; vanilla extract
1 1/2 Cups dark chocolate (chips or chopped) + more for topping
1 cup pecan halves, roughly chopped = more for topping
Flakey Sea Salt

INSTRUCTIONS

1. First, brown the butter. Add 1 cup of butter to a saucepan over medium heat.  Melt and continue to stir until it turns a rich amber color and gives off a nutty scent.

2. Pour into a large mixing bow, (make sure to scrape in the browned bits at the bottom of the pot.) and set aside to cool.

3. In a smaller bowl, whisk together the flour, baking soda, salt, and cinnamon.  Set aside.

4. Once the brown butter is no longer hot add the brown sugar, sugar, and molasses to the bowl.  Whisk to combine.  You can either do so by hand or with an electric mixer.  it should resemble the texture of a slushy.

5. Whisk in the eggs and vanilla until fully combined.

6. Pour in all of the dry ingredients and mix to incorporate.  Switch to a rubber spatula to fold in the ingredients once the dough starts to thicken.

7. Fold in the dark chocolate and pecans.  At this point, the dough should be sticky and be able to hold its shape when scooped.  If it's too thin, place it in the refrigerator uncovered for about 30 minutes to cool.

8. But if its already at the right consistency, scoop out the cookie dough using a 2 oz. scoop or a 1/4 measuring cup.  Place the scoops side by side on a plate or small baking sheet lined with wax or parchment paper.

9. Place extra chocolate chips and pecans on top of each cookie and chill for at least 30 minutes, or overnight.

10. When ready, place 5-6 large cookies on a large baking sheet lined with parchment paper and bake at 350 degrees for 13 - 15 minutes.  If your cookies are smaller than 2 oz., bake for 10 - 12 minutes.  The cookies are ready when the edges are golden and the middle looks puffed, pale, and a bit underdone.

11. When they are hot from the oven, sprinkle the tops with a bit of sea salt and transfer to a cooling rack.  If the cookies are too soft to move, let them sit on the cookie sheet for about 5 minutes and then try again.

12. Bake the remaining cookie dough and dig in!


This recipe comes from butternut bakery blog 


Creamy Roasted Cauliflower Soup

  Roasted cauliflower makes it taste amazing, and a little butter (instead of cream) makes it luxuriously creamy. Recipe yields 4 bowls of soup.


Ingredients

1 large head cauliflower (about 2 pounds), cut into bite-size florets
3 tablespoons extra-virgin olive oil, divided
Fine sea salt
1 medium red onion, chopped
2 cloves garlic, pressed or minced
4 cups (32 ounces) vegetable broth
2 tablespoons unsalted butter
1 tablespoon fresh lemon juice, or more if needed
Scant ¼ teaspoon ground nutmeg
For garnish: 2 tablespoons finely chopped fresh flat-leaf parsley, chives and/or green onions

Instructions

  1. Preheat the oven to 425 degrees Fahrenheit. If desired, line a large, rimmed baking sheet with parchment paper for easy cleanup.

  2. On the baking sheet, toss the cauliflower with 2 tablespoons of the olive oil until lightly and evenly coated in oil. Arrange the cauliflower in a single layer and sprinkle lightly with salt. Bake until the cauliflower is tender and caramelized on the edges, 25 to 35 minutes, tossing halfway.

  3. Once the cauliflower is almost done, in a Dutch oven or soup pot, warm the remaining 1 tablespoon olive oil over medium heat until shimmering. Add the onion and ¼ teaspoon salt. Cook, stirring occasionally, until the onion is softened and turning translucent, 5 to 7 minutes.

  4. Add the garlic and cook, stirring constantly, until fragrant, about 30 seconds, then add the broth.

  5. Reserve 4 of the prettiest roasted cauliflower florets for garnish. Then transfer the remaining cauliflower to the pot. Increase the heat to medium-high and bring the mixture to a simmer, then reduce the heat as necessary to maintain a gentle simmer. Cook, stirring occasionally, for 20 minutes, to give the flavors time to meld.

  6. Once the soup is done cooking, remove the pot from the heat and let it cool for a few minutes. Then, carefully transfer the hot soup to a blender, working in batches if necessary. (Do not fill past the maximum fill line or the soup could overflow!)

  7. Add the butter and blend until smooth. Add the lemon juice and nutmeg and blend again. Add additional salt, to taste (I usually add another ¼ to ¾ teaspoon, depending on the broth). This soup tastes amazing once it’s properly salted! You can also use a little more lemon juice, if it needs more zing. Blend again.

  8. Top individual bowls of soup with 1 roasted cauliflower floret and a sprinkle of chopped parsley, green onion and/or chives. This soup keeps well in the refrigerator, covered, for about four days, or for several months in the freezer


This recipe from CookieandKate.com

Sunday, May 19, 2024

Cherry Pie Bars

 “The recipe makes a lovely, buttery pound cake intertwined with cherry pie filling.”


Makes one - 9 x 13 -inch pan (about 18 servings)

INGREDIENTS

2 sticks unsalted butter, softened
2 cups granulated sugar
4 large eggs
2 cups all-purpose flour
1 teaspoon baking powder
½ teaspoon fine sea salt
One 21-ounce can cherry pie filling
Confectioners’ sugar, for glazing (optional; see note)

DIRECTIONS

1. Preheat oven to 350°F. Line a 9-by-13-inch pan with parchment paper.

2. In the bowl of a stand mixer, cream the butter and sugar together until light and fluffy, about 5 minutes. Add the eggs one at a time, beating until just combined. Add the flour, baking powder, and salt, and mix to combine. Spread a little over half the cake batter into the pan. Evenly spread the cherries over top, then spoon the rest of the cake batter over the cherries. (It’s fine if the cherries show through.)

3. Bake until the top has turned slightly golden, 30 to 35 minutes. (Do not over-bake.) Cool before slicing into squares.

Note: Optionally, you can finish the cherry pie bars with a glaze made from confectioners’ sugar. Combine about ¼ cup confectioners’ sugar with enough water to make a drizzly consistency, then drizzle over the bars before cutting and serving.


Sunday, May 12, 2024

Sex in a Pan (?) CAKE

I have not yet tried this cake, but I thought it looked really good, so I'm going to share it.
It comes from a blog called JoCooks.com.


Sex in a pan is a layered dessert. The bottom layer is the crust made with pecans, flour and butter. The next layer is a layer of cream cheese sweetened with powdered sugar and made fluffier with whipped cream. Then you have a layer of chocolate pudding, then another layer of vanilla pudding and top it off with whipping cream and then lastly you sprinkle it with chocolate. Does that not sound good?


Ingredients

Crust
1 cup pecans chopped
3 tbsp granulated sugar
½ cup unsalted butter melted
1 cup all-purpose flour

Cream cheese layer
8 oz cream cheese
1 cup powdered sugar also known as confectioner's sugar, use 1/2 cup for less sweetness
1 cup cool whip or whipped cream

Vanilla pudding
5.1 oz instant vanilla pudding
2 cups milk

Chocolate Pudding
5.1 oz instant chocolate pudding
2 cups milk

Toppings
2 cups cool whip or whipped cream
shaved chocolate optional

Instructions

  • Preheat oven to 350 F degrees.
  • Spray a 9×13 inch baking dish with cooking spray.
  • In a mixer, mix all the crust ingredients together and press the mixture into the prepared baking dish.
  • Bake it for about 20 minutes.
  • Prepare the vanilla pudding as per the instructions on the package. As noted I used 2 cups of milk instead of the 3 cups on the package instructions to get a firmer pudding. 
  • Prepare the chocolate pudding as per the instructions on the package. As noted I used 2 cups of milk instead of the 3 cups on the package instructions to get a firmer pudding.
  • In a mixer add the cream cheese, powdered sugar and the cup of whipped cream. Mix until light and fluffy.
  • Let the crust cool. Spread the cream cheese mixture over the crust evenly. Spread the vanilla pudding over the cream cheese layer, then the chocolate pudding. Spread the whipped cream as the last layer then top with shaved chocolate if preferred.
  • Refrigerate for a couple hours until it sets before serving.

Recipe Notes

  1. I used 2 cups of milk for my pudding, because I wanted a firmer pudding for the layers here, but feel free to use 3 cups of milk just as the instructions say.

  2. Please keep in mind that nutritional information is a rough estimate and can vary greatly based on products used.

  3. This recipe can be frozen also.   Just thaw in the fridge overnight.

Chef John's Stuffed Peppers

When was the last time you had a great stuffed bell pepper?

"This recipe's roots can be traced back to the Great Depression, when farmers first began selling the unripe peppers out of necessity. Of course, we did what Americans always do when faced with a new variety of food, we stuffed meat in it."

Ingredients

1 cup uncooked long grain white rice
2 cups water
Sauce:
1 onion, diced
1 tablespoon olive oil
2 cups marinara sauce or pasta sauce
1 cup beef broth
1 tablespoon balsamic vinegar
1/4 teaspoon crushed red pepper flakes

Peppers:

1 pound lean ground beef
1/4 pound hot Italian pork sausage, casing removed
1 (10 ounce) can diced tomatoes
1/4 cup chopped fresh Italian parsley
4 cloves garlic, minced
2 teaspoons salt
1 teaspoon freshly ground black pepper
1 pinch ground cayenne pepper
4 large green bell peppers, halved lengthwise and seeded
1 cup finely grated Parmigiano-Reggiano cheese, plus more for topping

Directions


  1. Preheat the oven to 375 degrees F (190 degrees C).
  2. Bring rice and water to a boil in a saucepan over high heat. Reduce heat to medium-low, cover, and simmer until the rice is tender, and the liquid has been absorbed, 20 to 25 minutes. Set the cooked rice aside.
  3. Cook onion and olive oil over medium heat until onion begins to soften, about 5 minutes. Transfer half of cooked onion to a large bowl and set aside.
  4. Stir marinara sauce, beef broth, balsamic vinegar, and red pepper flakes into the skillet; cook and stir for 1 minute.
  5. Pour sauce mixture into a 9x13-inch baking dish and set aside.
  6. Combine ground beef, Italian sausage, diced tomatoes, Italian parsley, garlic, salt, black pepper, and cayenne pepper into bowl with reserved onions; mix well. Stir in cooked rice and Parmigiano Reggiano. Stuff green bell peppers with beef and sausage mixture.
  7. Place stuffed green bell pepper halves in the baking dish over tomato sauce; sprinkle with remaining Parmigiano-Reggiano, cover baking dish with aluminum foil, and bake in the preheated oven for 45 minutes.
  8. Remove aluminum foil and bake until the meat is no longer pink, the green peppers are tender and the cheese is browned on top, an addition 20 to 25 minutes.
Printed From Allrecipes.com

Sunday, May 5, 2024

MARINATED CUCUMBERS ONIONS AND TOMATOES


INGREDIENTS
3 Medium cucumbers, peeled and sliced 1/4 inch thick
1 Medium Onion, sliced and separated into rings
3 Medium Tomatoes, cut into wedges
1/2 cup vinegar
1/4 cup sugar
2 teaspoons salt
1 teaspoon fresh coarse black pepper
1/4 cup oil


DIRECTIONS
Peel and slice the cucumber 1/4 inch thick, slice onion and separate into rings, then cut tomatoes into wedges and toss into a large mixing bowl.

Add in 1/2 cup vinegar, 1/4 cup sugar, 1 cup of water, 2 teaspoons salt, ground pepper, and oil.

Stir to combine and let chill for 1-2 hours.  Serve and enjoy.


Garlic Aioli Sauce


Classic Homemade Aioli


INGREDIENTS

  • 4 cloves garlic
  • 1 teaspoon kosher salt
  • 1 teaspoon lemon zest
  • 2 tablespoons + 2 teaspoons fresh lemon juice
  • 1/2 teaspoon Dijon mustard, optional
  • 1 large egg
  • 1 egg yolk
  • 1/2 cup olive oil
  • 1/2 cup light-tasting olive oil or vegetable oil
  • parsley, to garnish, optional           

Instructions

How to make Classic Homemade Aioli:

  1. Use a chef's knife to smash 4 cloves of garlic. Remove the peels and mince the garlic finely.
  2. Top the garlic with 1 teaspoon kosher salt. Use the side of the chef's knife to smash the salt into the garlic, over and over, making a paste. See photos.
  3. Add the salt and garlic to a blender, or if you plan to use an immersion blender, add it to a mason jar or whatever to want to blend in.* (See note if you are not using a blender!) Add about 1 teaspoon lemon zest to the garlic and salt. 
  4. Add 2 tablespoons + 2 teaspoons lemon juice to the garlic. Add about 1/2 teaspoon of Dijon mustard. Stir it together with a spoon and let the mixture sit for about 15 minutes, to let all the flavors get nice and friendly.
  5. At this point if you are garlic shy, you can use a spoon to strain out some of the garlic. The garlic has already worked a lot of magic on the lemon juice just from the 15 minute marinade. I left it all in because I am a garlic freak. But if you plan on kissing anyone soon, you might want to remove some (up to half or more) of the minced garlic, being careful to strain it well so you don't lose any lemon juice.
  6. Add 1 large egg and 1 egg yolk. If you are using a regular blender or making this in a bowl, slowly drizzle 1/2 cup olive oil and 1/2 cup light tasting olive oil or vegetable oil into the bowl while whisking constantly*, or drizzle the oil into the blender while it is running. Blend or whisk until smooth.
  7. If you are using an immersion blender, add all the oil at once and place your immersion blender all the way at the bottom of your container. Blend on low, slowly moving the blender up higher and high, until it is all emulsified.
  8. Taste it and add salt and pepper as needed, or a bit more lemon or Dijon if you want.
  9. Garnish with chopped parsley.

    Eat with french fries. It's also great with a fresh relish tray: carrots, celery, broccoli, cauliflower, snap peas, etc. Try dipping roasted brussels sprouts in aioli. Slap it on a sandwich. It's also really great on a burger The options are endless!

    Recipe Notes

    Variation: Aioli reaches a whole different level when you roast the garlic first. Spread 4-5 cloves of unpeeled garlic on some foil, drizzle with olive oil, and wrap up. Roast at 400 for about 30-40 minutes until a fork slides in easily. Let cool. Prepare aioli with the garlic as usual. 

    *If you do not have a blender or immersion blender, you can do all this in a bowl. Whisk all the ingredients together up until the eggs, then SLOWLY whisk in the oil in a gradual stream. Whisk constantly while slowly adding oil to make sure it emulsifies. 

    The flavor of olive oil is kind of strong, which is why we are toning that flavor down with a lighter flavored oil. (But if you only have one kind or the other, it's still going to taste great!)


See step by step directions and other dipping sauce ideas here.

Crispy Skin Slow Roasted Pork Shoulder


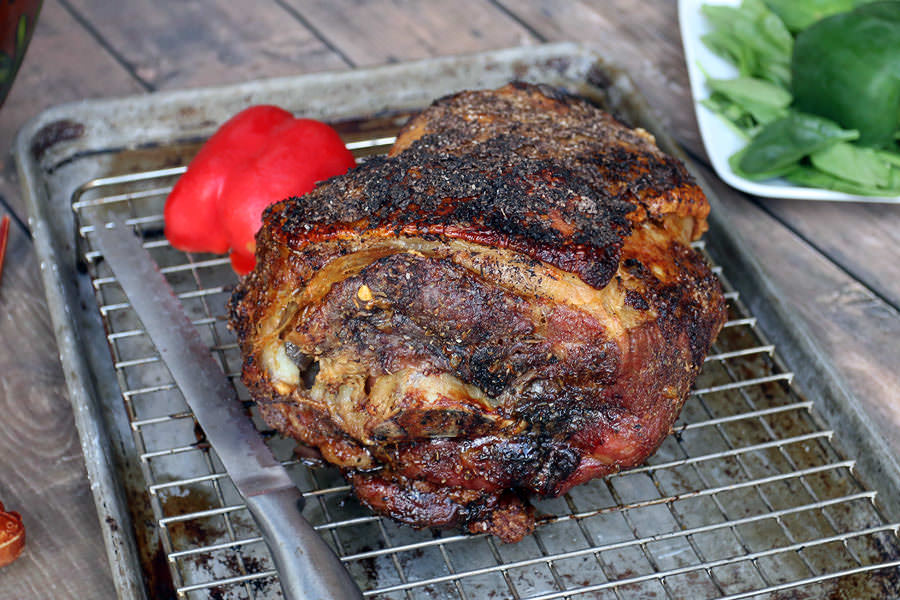
I will put this roast in the oven and enjoy the aroma ALL DAY LONG!


PorkShoulderLong1
I grew up on this roast.  My family is German and Bohemian, and we always put Caraway Seed on it, and served it with sauerkraut, potato dumplings, and a brown gravy made from the roast drippings.  If you're interested, the recipe, Pork, Sauerkraut & Dumplings, is in our first Harter House Cookbook.

I bet, it’ll feed your entire family for a few days! 

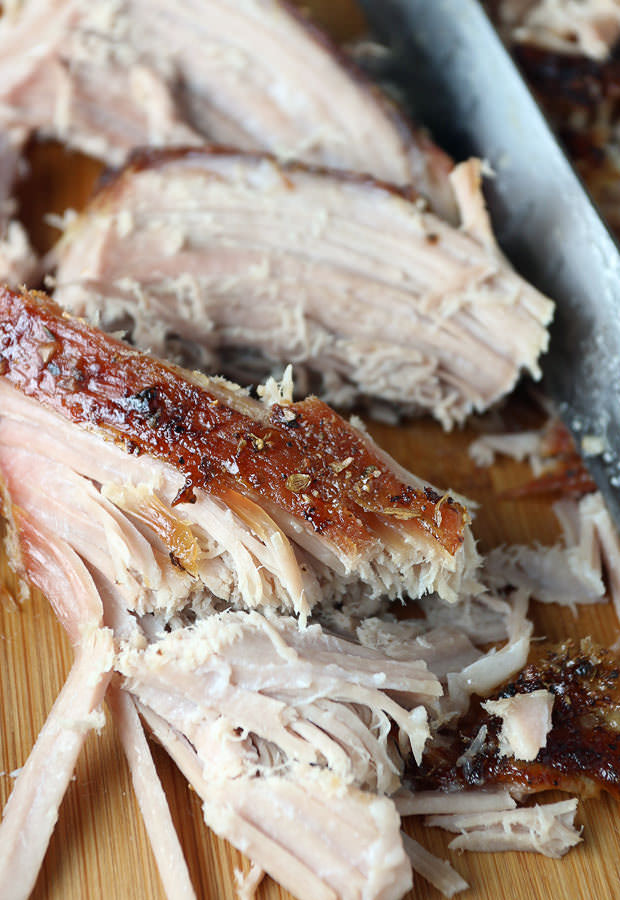
It makes the best Pulled Pork and it's just plain delicious. 

There are 2 parts of the pork shoulder – the Picnic Roast (what we’re using) and Boston Butt (which comes from the upper part of the shoulder).

The Picnic roast will have meaty chunks of pork that we can literally pull apart with our fingers. It does take a little extra cooking time, and a little more patience  - and a really great value.

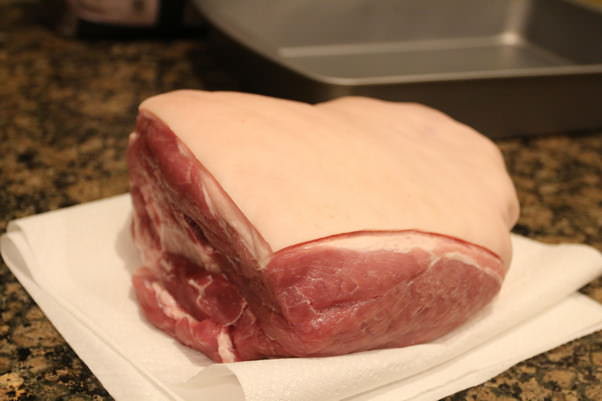
When you purchase a fresh picnic at Harter House, it is usually frozen. (Fresh meaning not cured, as in a ham) I have learned that if I put the roast in the oven frozen, at 350 degrees for 7-8 hours, it turns our perfect and the skin is ALWAYS crispy.


The following recipe comes from ruled.me  blog.
"This recipe cooks the roast from a thawed state, at a lower temperature, for a longer period of time.
Since I am a huge fan of the crispy skin, I have always cooked the roast from the frozen state to ensure the crispy skin."  ~Shelly

8 lbs. Pork Shoulder (bone-in, skin-on)
3 1/2 tbsp. Salt
2 tsp. Oregano
1 tsp. Black Pepper
1 tsp. Garlic Powder
1 tsp. Onion Powder
1. Completely wash and pat dry the pork. Leave on the counter-top for 2-3 hours to come to room temperature.
IMG_5388

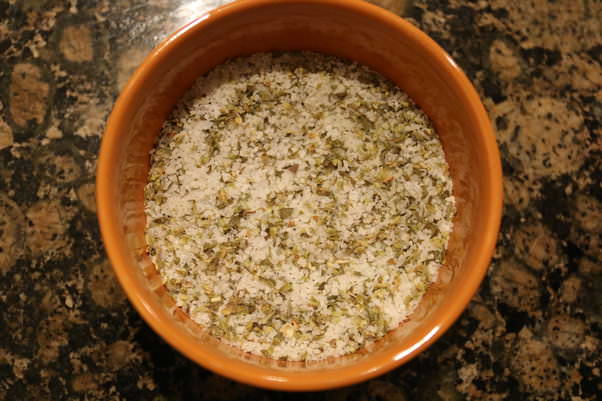
2. Once the pork has been dried and is coming to room temperature (after a few hours), preheat your oven to 250F. Mix together all of the spices in a bowl.
IMG_5384

3. Starting skin side down, pat the salt rub all over the pork to completely cover it. Once the bottom is done, flip and place on a wire rack that’s sitting over a baking sheet covered in foil. Spread the rub on all sides and top of the pork.
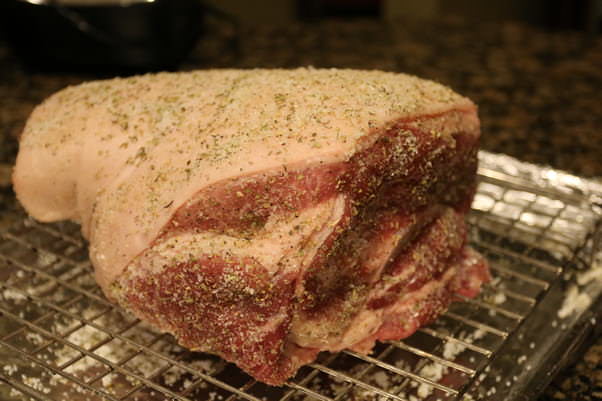
IMG_5396

4. Once your oven is preheated and pork rubbed, place into the oven and bake for anywhere between 8-10 hours. I did 10 hours for my 8 lb. roast, but if you have smaller sizes or bigger sizes, you will have to adjust accordingly. You essentially want the internal temperature to be about 190F.
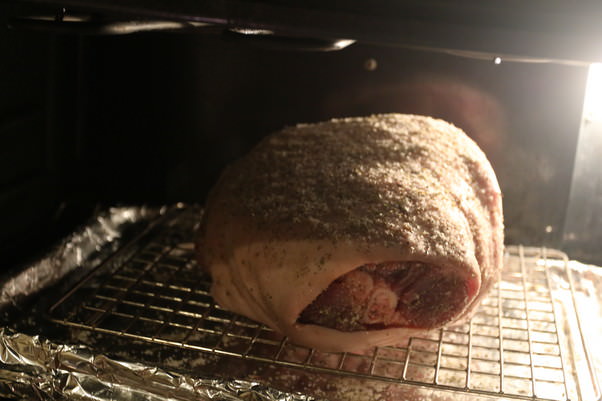
IMG_5398

5. Remove the pork from the oven and cover with foil. Allow the pork to rest for 15 total minutes. Preheat oven to 500F.
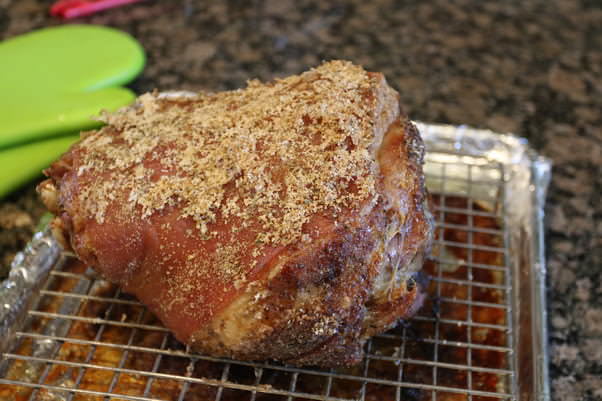
IMG_5405

6. Once pork is rested and oven heated to  500 F, remove the foil tent from the pork and place into the oven. We will rotate the pork every 5 minutes to allow for even cooking of the skin (YAY CRACKLINS’). There may be smoke that comes out of your oven during this process due to the fat that dripped off during the roasting time. You can either open the window or remove this fat previous to putting into the oven.
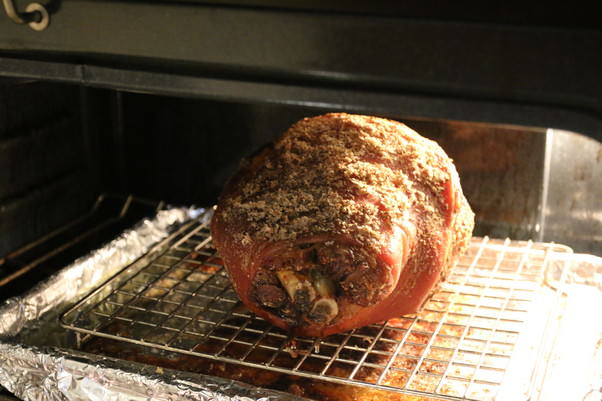
IMG_5421

7. Take the pork out of the oven and let rest for 15-20 minutes before slicing/digging in.
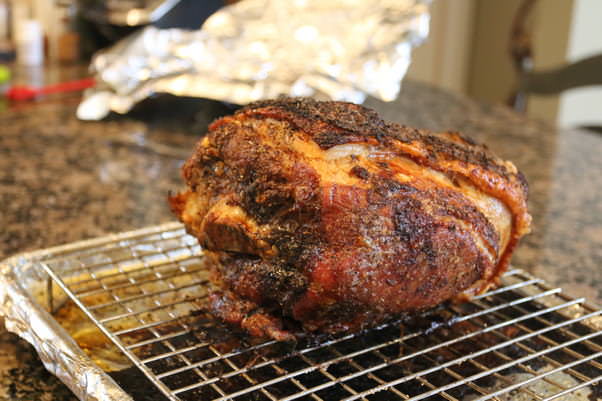
IMG_5422

8. Serve up for family and friends alike – the pork should be completely tender, easily separating from the roast by pulling the meat off with your fingers.
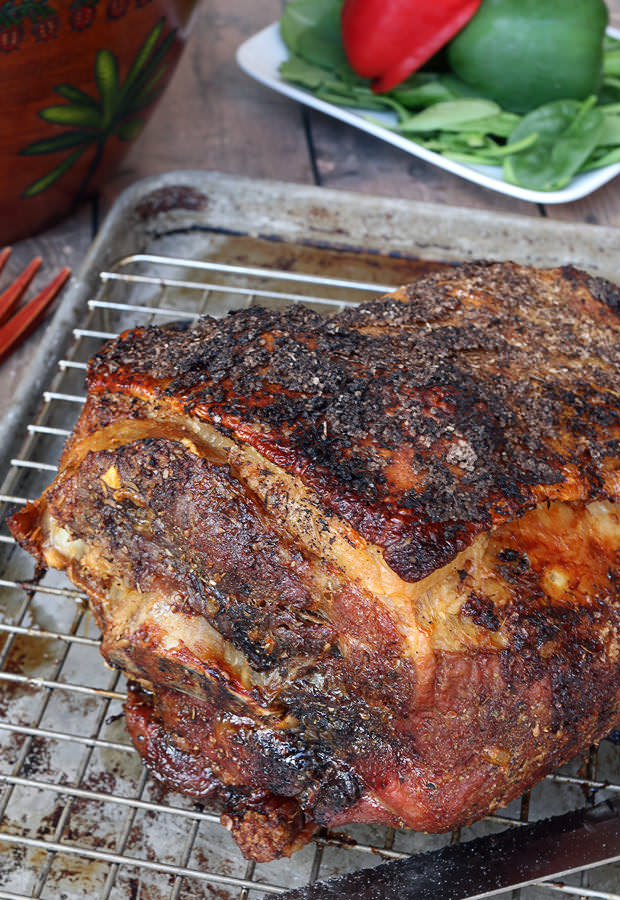
Crispy Skin Slow Roasted Pork Shoulder That Pulls Apart With Your Fingers | Shared via www.ruled.me/

This makes a total of 20 (6 oz.) servings of Crispy Skin Pork Shoulder. 

ENJOY!